Learn Excel With Mr Excel Part 1: Introduction & Excel Environment

Liên hệ QC
CONTROL SETTINGS FOR EVERY NEW WORKBOOK AND WORKSHEET
KIỂM SOÁT CÁC THIẾT LẬP CHO MỌI FILE EXCEL MỚI VÀ SHEET MỚI.

Problem:
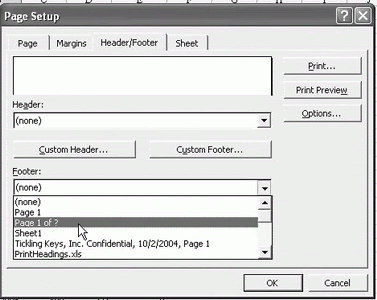
Every time that you start a new workbook or insert a new worksheet, you always make the same customizations. These may include setting print scaling to fit to one page wide, setting certain margins,
adding a “Page 1 of n” footer to the worksheet, as shown in Fig. 75, making the heading row to be in bold text, and so forth.
Strategy:
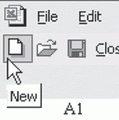
There are two files that control the defaults for new workbooks and inserted worksheets. You can easily customize a blank workbook to contain your favorite settings and then save the file as book.xlt or sheet.xlt. Any time that you choose either the New Workbook icon, as shown in Fig. 76, or the Insert – Worksheet command, the new book or sheet will inherit the settings from these files.

Vấn đề: Mỗi lần bạn tạo 1 file mới hay chèn vào 1 sheet mới, bạn muốn chúng được tạo theo cùng 1 định dạng. Những định dạng này có thể bao gồm định dạng tỷ lệ trang cho vừa bề rộng 1 trang in, định dạng các lề trang, đánh số trang kiểu “trang 1 /n” ở footer như hình 75, định dạng dòng tiêu đề đầu trang là chữ đậm và mọi thứ khác.
Giải pháp: Có 2 file kiểm soát địinh dạng mặc định của file mới và sheet mới. Bạn hãy tạo định dạng 1 file trống theo ý thích của bạn sau đó lưu lại dưới tên book.xlt và sheet.xlt. Sau này mỗi khi bạn nhấn nút tạo file mới, hay mở Menu Insert - Worksheet, 1 file mới hay 1 sheet mới sẽ thừa hưởng những định dạng của những file này.

Fig-75.gif


Fig. 75


Fig-76.gif


Fig. 76


Follow these steps to create book.xlt.
1) In Excel, open a new blank workbook by using the New icon in the Standard toolbar.
2) Customize the workbook. Feel free to make adjustments to any of the following:
• File – Page Setup
• File – Set Print Area
• Cell Styles
• Format – Cells
• Data – Validation settings
• Number and type of sheets in the workbook
• Window view options from the Tools – Options – View tab

Làm theo các bước sau để tạo file book.xlt.
1. Mở 1 file Excel mới trắng, bằng biểu tượng New trên toolbar.
2. Định dạng bảng tính. Cứ tự nhiên thiết lập lại các định dạng sau:
- Định dạng trang in.
- Xác định vùng in
- Kiểu định dạng cho ô
- Các định dạng ô
- Thiết lập Validation
- Số lượng và loại sheets trong file
-Các chọn lựa thể hiện trong Tools – Option – View

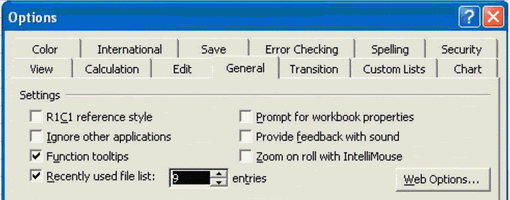
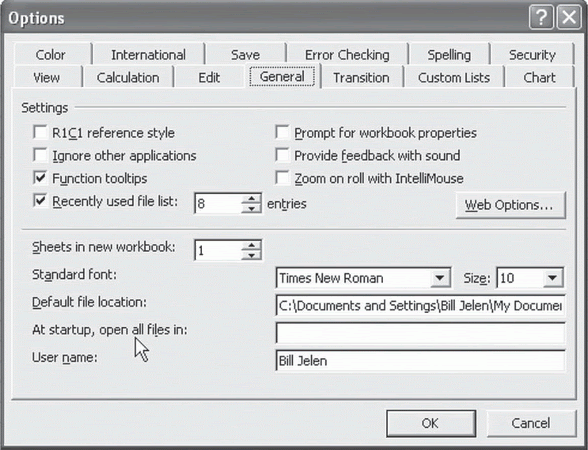
3) Decide where you want to save the file. This can be either in the XLStart folder (generally C:\Program Files\Microsoft Office\Excel\XLStart) or in the Alternate Startup folder. (Find or setup an Alternate Startup folder on the Tools – Options – General dialog.)
4) Select File – Save As. In the Save As dialog, Save as Type dropdown, choose Template, as shown in Fig. 77.
5) Browse to the XLStart folder (see Step 3).
6) Save the file as Book.xlt

3. Chọn nơi sẽ lưu trữ file: Địa chỉ này có thể là thu mục XlStart (thường là C:\ Program Files\Microsoft Office\Excel\XLStart) hoặc là 1 thư mục Startup thay thế. Thư mục thay thế này tìm hoặc tạo theo ý muốn tại hộp thoại Tools – Option – General.
4. CHọn Menu File – Save As. Trong hộp thoại hiện ra chọn Template trong danh sách xổ xuống Save As Type.
5. Tìm đến thư mục khởi động, nhấn Save As.

Result:
All subsequent new workbooks will inherit the settings from this file.

Kết quả: Mọi file mới tạo sẽ có định dạng đầy đủ như đã thiết lập ở bước 2.

Fig-77.gif


Fig. 77


46 of 853

Additional Information:
You can also set up a workbook with one worksheet. Save this workbook as Sheet.XLT. All inserted worksheets will inherit the settings from this file.
Summary:
Rather than constantly setting the same settings for all new workbooks, save your favorite settings in either book.xlt or sheet.xlt in the XLStart folder. All new workbooks will inherit these settings.

Nói thêm: Bạn có thể tạo 1 file mới với chỉ 1 bảng tính. Sau đo lưu dưới tên Sheet.xlt. Mọi sheet mới được chèn thêm sau này sẽ có định dạng y như bạn muốn.
Tóm tắt: Thay vì thiết lập những định dạng giống nhau cho nhiều những bảng tính mới tạo, hãy lưu những định dạng ưa thích của bạn thanh file template book.xls hoặc sheet.xlt vào thư mục khởi động của Excel. Mọi file mới và sheet mới sẽ thừa hưởng những định dạng này.
 
Lần chỉnh sửa cuối:
OPEN A COPY OF A WORKBOOK
MỞ 1 BẢN SAO CỦA FILE EXCEL.

Problem:
You have an invoice.xls workbook. You want to keep the original file unchanged and save as a new workbook. Except, you tend to forget to use File – Save As.
Strategy:
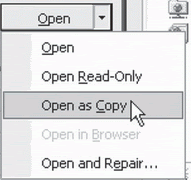
When using File – Open, you can specify that you want to open as a copy.
1) Instead of choosing the Open button, use the dropdown arrow next to the button. Choose Open as Copy, as shown in Fig. 78. The file that opens will be named “Copy (1) of invoice.xls”.
2) Use File – Save As to save the file with a new name. However, even if you forget to use Save As, at least you will not overwrite the original invoice.xls.

Vấn đề: Bạn có 1 file invoilce.xls. Bạn muốn giữ nguyên bản gốc này và lưu 1 bản sao dưới tên khác , và bạn thường quên sử dụng menu FIle – Save As.
Biện pháp: Khi sử dụng lệnh Menu File – Open, bạn có thể chọn chỉ mở 1 bản sao.
- thay vì nhấn Open, bạn nhấn mũi tên xổ xuống kế bên nút Open, chọn Open As Copy. FIle sẽ được mở với tên mới “Copy (1) of invoice.xls”
- Dùng lệnh File - Save As để lưu lại dưới tên khác. Dù vậy nếu bạn có quên Save As, ít nhất bạn cũng không chép đè lên file gốc.

Fig-78.gif


Fig. 78


Summary:
To open a copy of a workbook, instead of choosing the Open button, use the dropdown arrow next to the button and choose Open as Copy.
Tóm tắt: Để mở 1 bản sao của 1 file vì không muốn tình cờ lưuđè lên file gốc, hãy dùng Open As Copy thay vì nhấn ngay nút Open.

OPEN A SAVED FILE WHOSE NAME YOU CANNOT RECALL
MỞ 1 FILE EXCEL MÀ BẠN LƯUĐÃ LÂU MÀ QUÊN TÊN
Problem:
You created and saved a file on last Wednesday. It is no longer in your recently used file list on the File menu and you cannot remember its name.
Strategy:
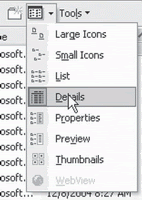
Use the Details icon to find the files you saved last Wednesday.
1) Select File – Open. At the top of the open dialog, choose the Details icon, as shown in Fig. 79.

Vấn đề: Bạn tạo 1 file Excel vào thứ tư tuần trước, nó chẳng còn nằm trong danh sách những file mới mở gần nhất và bạn không thể nào nhớ tên nó.
Giải pháp: Dùng nút Details để tìm kiếm.
1. Gọi lệnh File – Open. Ở trên đỉnh hộp thoại Open, chọn vào biểu tượng Details.

Fig-79.gif


Fig. 79

48 of 853

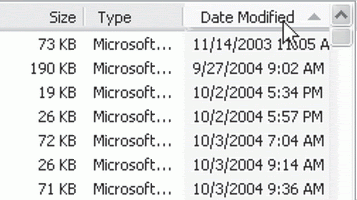
2) You can now see file names and also dates and times of the last save. Sort by date by clicking on the Date Modified header, as shown in Fig. 80. The first click could sort either ascending or descending.
3) Use the Scroll bar to go to the top of the list. If it does not contain recent files, click the date header again to sort descending. You can now scroll back to last Wednesday to find the file.
Summary: Use the Details mode of the Open dialog to sort files by date, time, or name.

2. Giờ thì bạn thấy những tên file và ngày giờ của lần lưu cuối cùng. Sắp xếp lại danh sách theo ngày tháng bằng cách click vào tiêu đề Date Modified, như hình 80, Click lần đầu có thể là theo thứ tự tăng dần hoặc giảm dần.
3. Dùng thanh trượt để lên đầu của danh sách, Nếu nó không cho tên những file gần nhất, hãy click lần nữa để sắp xếp lại theo thứ tự ngược lại. Bây giờ bạn hãy đi tìm trong sốnhững file bạn lưu thứ tư tuần trước.

Fig-80.gif


Fig. 80


SUPPRESS THE UPDATE LINKS MESSAGE
NGĂN CHẶN THÔNG BÁO ĐÒI CẬP NHẬT FILE.

Problem:
You have a model that you send to others. When they open the model, they are always asked if they should update the links, as shown in Fig. 81. They need to answer Don’t Update and the workbook
will open fine. Is there any way to suppress the question in the first place?
Vấn đề: Bạn có 1 file mà bạn đã gởi cho ai đó. Khi họ mở file, họ luôn bị hỏi có cập nhật dữ liệu không như hình 81, Họ phải trả lời “không” mới mở được file. Có cách nào để đừng hiện cái thông báo hỏi đi hỏi lại đó không?

Fig-81.gif


Fig. 81


Strategy:
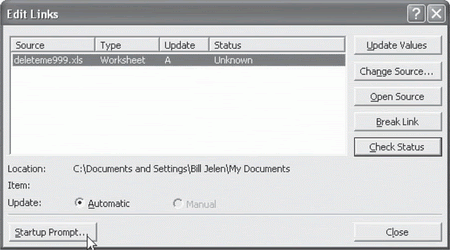
Control this message by using the Edit Links dialog box.
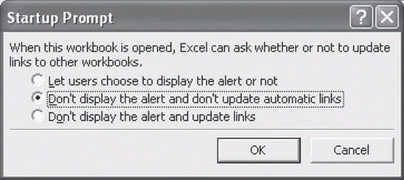
1) From the Excel menu, select Edit – Links to display the Edit Links dialog box. Choose the Startup Prompt button in the lower left corner of the dialog box, as shown in Fig. 82.

Biện pháp: Kiểm soát việc này bằng cách dùng hộp thoại Edit links.
- Mở Menu Edit – Links, hiện hộp thoại đó. Chọn nút Startup Prompt ở góc dưới bên phải hộp thoại như hình 82.

Fig-82.gif


Fig. 82


2) In the Startup Prompt dialog, choose the second option, Don’t Display the Alert and Don’t Update Automatic Links, as shown in Fig. 83. Choose OK. This setting will only affect the current workbook.

- Trong hộp thoại Startup Prompt, chọn mục chọn thứ 2 Don’t Display the Alert and Don’t Update Automatic Links, như hình 83, nhấn OK. Thiết lập này chỉ có giá trịđối với bảng tính hiện hành.

Fig-83.gif


Fig. 83


Additional Details:
On your own PC, in order to have the links updated, you should visit the Edit – Links dialog and choose the Update Now button.
Summary:
You can suppress the Update Links dialog box.
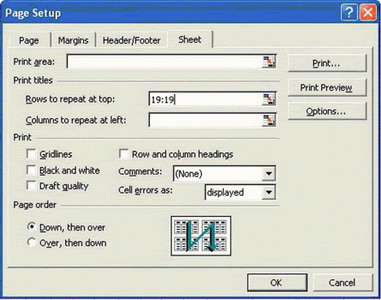
Nói thêm: Trên bảng tính của bạn, muốn cập nhật bạn phải vào menu Edit- Links, chọn Update Now.
Tóm tắt: Bạn có thể ngăn chặn việc xuất hiện hộp thoại yêu cầu cập nhật file.
 
Lần chỉnh sửa cuối:

SEND EXCEL FILE AS AN ATTACHMENT
GỞI FILE EXCEL NHƯ LÀ 1 FILE ĐÍNH KÈM THEO MAIL.

Problem: You need to send the currently open Excel workbook as an attachment to Outlook e-mail.
Strategy: Use File – Send To – Mail Recipient (as Attachment), as shown in Fig. 84.

Vấn đề: Bạn đang làm 1 file Excel vừa xong còn đang mở, và muốn gởi kèm nó theo 1 e-mail trong Oulook.
Biện pháp: Dùng menu File – Send to – Mail Recipient As Attachment như hình 84.

Fig-84.gif


Fig. 84

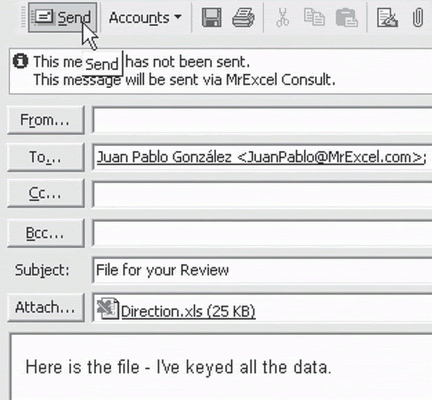
This will open something that you will swear is the Outlook Send Mail dialog. Fill out the addressee list, a subject, and click send as shown in Fig. 85.

Việc này sẽ mở hộp thoại gởi thư của Outlook. Điền địa chỉ người nhận, tiêu đề, 1 vài câu nội dung rồi nhấn Send.

Fig-85.gif


Fig. 85

Gotcha: Although this looks like Outlook, you are actually using an Excel version of the dialog. You will find that while this dialog is displayed, you cannot access other Outlook e-mails.
This is a problem. What if you receive a file from someone not in your address book, edit the file and then need to send it back? You will find that you need to access the original e-mail to get the sender’s e-mail address, but you cannot switch to another e-mail message until you’ve sent this one.
The solution is to press the Save icon in the Standard toolbar of the email dialog. Then use the Close X icon in the upper right corner of the window. This will save the unfinished e-mail from Excel to the Outlook inbox and return you to Excel. You can now safely switch back to the original Outlook e-mail to get the address.

Kết quả: Dù rằng nó giống như màn hình của Outlook, bạn đang sử dụng 1 biến thể theo Excel của Outlook. Bạn sẽ thấy rằng khi màn hình này còn đang mở, bạn sẽ không sử dụng được Outlook để gởi mail thông thường.
Đây quả là vấn đề, Vậy là thế nào nếu bạn nhận 1 file từ 1 người nào đó chưa có tên trong danhsách mail của bạn, sửa lại file và gởi trả lại? Bạn sẽ thấy rằng bạn cần mở Outlook thực sự để lấy địa chỉ người gởi, nhưng bạn lại không thể mở Outlook 1 khi bạn chưa gởi file này đi.
Giải pháp là: Nhấn nút save để lưu email và đóng cửa sổ gởi mail này lại. VIệc này sẽ lưu cái e-mail chưa hoàn tất vào hộp thư của Outlook và đưa bạn quay lại Excel. Giờ thì bạn có thể đàng hoàng mở Oulook thật để lấy địa chỉ người gởi.
 
SAVE EXCEL DATA AS A TEXT FILE
LƯU EXCEL DƯỚI DẠNG FILE TEXT

Problem: You have an Excel file as shown in Fig. 86. You need to produce a file for another application to read. This application can only read .txt files.
Strategy: There are a couple of options. Typically, the other application will either want each column to be separated by a fixed number of spaces or separated by a comma. Files with columns separated by a
comma are called Comma Separated Values, or CSV files. CSV files are easier to create than space-separated files.

Vấn đề: Bạn có 1 file Excel như hình 86, Bạn cần tạo 1 file để những phần mềm ứng dụng khác có thể đọc. Ứng dụng này chỉ có thể đọc file .txt
Biện pháp: Có 1 số cách để làm. Thông thường, ứng dụng khác sẽ muốn mỗi cột sẽ được phân cách bởi 1 số định trước cac ký hiệu trống, hoặc phân cách bởi dấu phẩy. File có các cột phân các bằng dấu phẩy gọi là file Comma Separated Values viết tắt là file .CSV. File CSV đễ tạo hơn file dùng khoảng trắng phân cách cột.

Fig-86.jpg


Fig. 86

Method 1: Create a CSV file.
1) Use File – Save As. In the Save as Type dropdown, choose CSV, as shown in Fig. 87.
Phương pháp 1: Tạo file CSV:
1. Dùng lệnh File - Save As, Trong phần xổ xuống của File Type, chọn CSV.

Fig-87.gif


Fig. 87

2) Choose the Save button. Important: Only the current worksheet is saved in the CSV file. If you have multiple worksheets in the workbook, you will have to save each worksheet separately. Also, Excel
will generally warn you that you are saving the file in a format that will leave out incompatible features, as shown in Fig. 88.
3) You can generally keep two versions of each file. Save it as XLS and then save it as CSV.
Result: Fig. 89 shows the created file as it appears when edited with Notepad. Pay icular attention to the “Molson, Inc” entry. Because cell D4 already had a comma, Excel was smart enough to surround Molson,
Inc with quotation marks, as shown in Fig. 89.

2. Nhấn nút Save, Quan trọng đây: Chỉ bảng tính hiện hành được lưu lại thành CSV. Nếu bạn có nhiều bảng tính, phải chọn cách lưu lần lượt từng sheet. Đồng thời Excel cũng sẽ cảnh báo cho bạn rằng b5n đang lưu bảng tính thành 1 dạng file mà các vật thể (object) không thích hợp sẽ không được lưu theo.
3. 3. Bạn có thể đồng thời lưu file dưới cả 2 dạng CSV và Xls.
Kết quả: Hình 89 sẽ cho thấy file CSV sẽ được thấy như thế nào khi mở bằng Notepad.Để ý cái giá trị “Molson, Inc.” Bởi vì ô D4 có sẵn 1dấu phẩy, nên Excel thừa thông minh để bọc dữ liệyu trong D4 vào 1 cặp nháy kép.

Fig-88.gif


Fig. 88

Fig-89.gif


Fig. 89

Gotcha: The dates in column C are written to the file in the same format as they were shown on the worksheet. Most programs will not understand a date such as “1-Jan-04”. You probably should format column
C to appear as mm/dd/yyyy before exporting to CSV. Check the documentation of the program that will import the information.
Ghi chú:Ngày tháng trong cột C được định dạng y như định dạng của nó trong bảng tính. Một số ứng dụng đọc file sẽ không hiểu kiểu ngày tháng như “1-Jan-04”, vậy bạn nên định dạng sẵn nó dưới dạng dd/mm/yyyy trước khi lưu thành CSV. Kiểm tra xem ứng dụng đó có hiểu nó không.


To be continued
 
SAVE EXCEL DATA AS A TEXT FILE (continue)
LƯU EXCEL DƯỚI DẠNG FILE TEXT (tiếp theo)
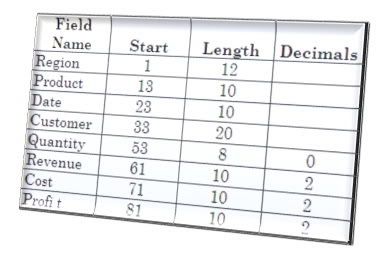
Method 2: The second option is to create a file where each field is supposed to take a fixed number of characters. In this case, the other application will usually give you a file specification for you to follow. It
might indicate:

Cách 2: Cách thứ 2 là tạo 1 file với mỗi trường dữ liệu được ấn định 1 độ rộng là bao nhiêu ký tự. Trong trường hợp này, ứng dụng đó sẽ cho bạn 1 bản mô tả trường dữ liệu để bạn làm theo:

Fig-89a.jpg


Fig 89a

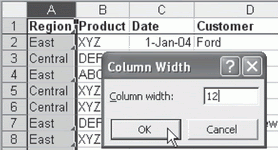
1) If this is the case, you will have to go through the columns in the worksheet, resetting the column width. If the other program expects the Region field to be 12 characters wide, select column A and use Format – Column – Width to change to 12, as shown in Fig. 90.

1. Trong trường hợp này, bạn phải đi qua các cột của bảng tính, cài đặt lại các độ rộng cột của Excel. Nếu ứng dụng đó yêu cầu độ rộng cột là 12 ký tự, hãy chỉnh lại độ rộng cột thành 12 trong Format – Column Width.

Fig-90.gif


Fig. 90

2) As shown in Fig. 91, format the dates as specified by the other system. Make sure that the Revenue, Cost, and Profit columns show two decimal places. The other system probably will not want field headings. Delete row 1.

2. Như hình 91, định dạng ngày theo kiểu của ứng dụng đó yêu cầu. Và đảm bảo rằng các trường Doanh thu, Giá vốn và lợi nhuận được định dạng 2 số thập phân. Ứng dụng đó cũng có thể không dùng tiêu đề cột. Vậy phải xoá dòng 1.

Fig-91.gif


Fig. 91

3) Use File – Save As. In the Save as Type dropdown, select Formatted Text (Space Delimited), as shown in Fig. 92.
3. Dùng lệnh FIle Save As, chọn file type là Formatted Text (Space Delimited)

Fig-92.gif


Fig. 92

4) As shown in Fig. 94, Excel will warn you that you will lose features if you have multiple sheets. Choose OK.
Fig. 95 shows the resulting file as viewed in Notepad:
Note: Excel changes the file name to have a .prn extension. Even if you try to change the extension to .txt here, Excel will still save the file as SaveAsText.Txt.Prn, as shown in Fig. 93. It is best to leave it as .prn and then rename in Windows Explorer.

4. HÌnh 94 là cảnh báo rằng chỉ 1 sheet hiện hành được lưu. nhấn OK. Hình 95 cho thấy file trông thế nào khi mở bằng notepad.
Ghi chú: Excel đổi tên file với phần đuôi .prn. Dù bạn cố đặt tên đuôi file là txt, Excel cũng sẽ tạo file SaveasText.txt.prn. Tốt nhất là cứ lưu thành file prn sau đó sửa tên đuôi ngoài Explorer

Fig-93.gif


Fig. 93

Fig-94.gif


Fig. 94

Fig-95.gif


Fig. 95
 
USE A LASER PRINTER TO HAVE EXCEL CALCULATE FASTER
DÙNG 1 MÁY IN LASER ĐỂ GIÚP EXCEL TÍNH TOÁN NHANH HƠN.

Problem: Believe it or not, Excel uses your print driver to draw the screen.
Vấn đề: Dù tin hay không, Excel dùng Driver máy in của bạn để thể hiện lên màn hình.

Strategy: Having an HP LaserJet as your default printer can allow Excel operations to finish in one-fourth of the time it takes if you have a cheap inkjet driver as the default. We’ve tested this.
If response time is critical, download and install the print drivers for an HP LaserJet. Set it as the default printer during calculations.
Gotcha: If you don’t actually have a LaserJet hooked to your printer, you will have to refrain from using the printer icon. You will always have to print with File – Print and choose a non-default printer.

Cách làm: Có 1 máy in HP LaserJet làm máy in mặc định có thể làm cho Excel tính toán chỉ bằng ¼ thời gian so với khi bạn có máy in mặc định là 1 máy in phun. Tôi đã kiểm tra rồi.
Nếu thời gian chờ tính toán lâu, hãy tìm 1 Driver máy in HP Laser Jet. Thiết lập nó thành máy in mặc định.
Ghi chú: Nếu bạn thực sự không có cái máy in Laser đó, bạn hãy bỏ thói quen nhấn nút in trên toolbar. Bạn phải dùng lệnh File – Print (hoặc Ctrl+P) và chọn máy in đúng.

USE EXCEL AS A WORD PROCESSOR
DÙNG EXCEL NHƯ LÀ PHẦN MỀM SOẠN THẢO VĂN BẢN

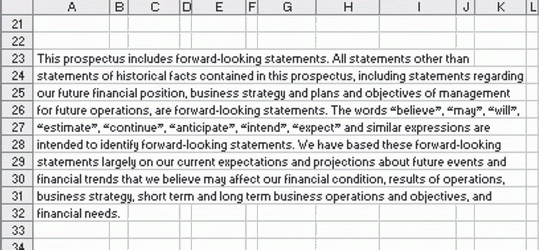
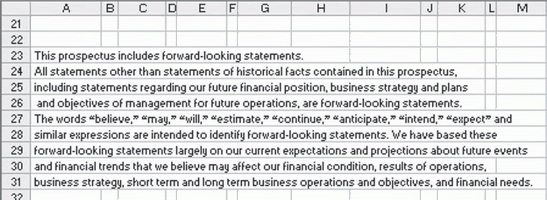
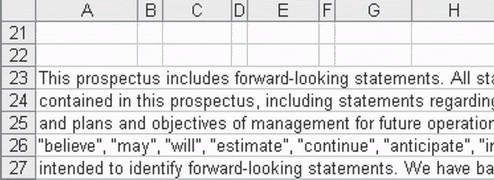
Problem: You need to type some notes at the bottom of the report, as shown in Fig. 96. How can you make the words fill each line as if you had typed them in Word?
Strategy: Use the Justify command on the Fill menu.
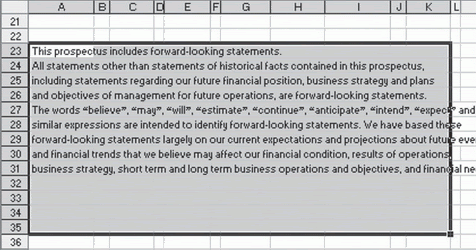
1) If you want the words to fill columns A through K, then select a range such as A23:K35. Note that you are including a few blank rows in the selection, as shown in Fig. 97.

Vấn đề: Bạn cần soạn 1 đọan văn bản ghi chú ở cuối phần báo cáo như hình 96. Bạn làm sao để cho các từ gõ vào lấp đầy các ô theo dòng như là gõ trong Word?
Giải pháp: Dùng lệnh Justify trong Menu Edit - Fill.
1. Nếu bạn muốn canh lấp đầy ô tù cột A đến cột K, hãy chọn vùng A23:K35. Ghi nhớ rằng bạn hãy chọn dư thêm vài dòng trống.

Fig-96.gif


Fig. 96

Fig-97.gif


Fig. 97

58 of 853
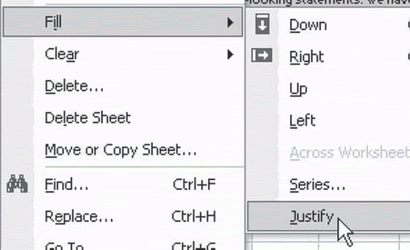
2) From the menu, select Edit – Fill – Justify, as shown in Fig. 98.
Result: Excel will rearrange the text to fill each row, as shown in Fig. 99.
Gotcha: As shown in Fig. 100, if you have a few words in bold in one cell, this formatting will be lost.

2. Chọn Menu Edit – Fill – Justify, như hình 98
Kết quả: Excel sẽ thực hiện sắp xếp lại các từ để lấp đầy mỗi dòng như hình 99
Ghi chú: Như hình 100, nếu bạn có vài từ muốn in đậm, nó sẽ mất định dạng sau khi thực hiện.

Fig-98.gif


Fig. 98

Fig-99.gif


Fig. 99

Fig-100.gif


Fig. 100

59 of 853
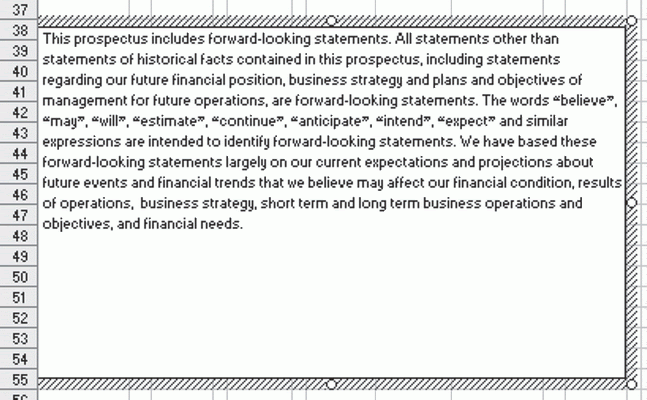
Alternate Strategy: Textboxes also solve this problem. Draw a textbox to fill columns A through K and paste your text into the textbox, as shown in Fig. 101.
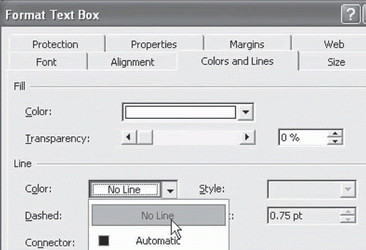
You can format the textbox to hide its border. Ctrl+Right-click on the border of the text box and choose Format Textbox. On the Colors and Lines tab, choose No Line from the Line color dropdown, as shown in Fig. 102.

Cách thứ 2: Sử dụng Textbox. Vẽ 1 Textbox trùm lên các cột từ A đến K và sao chép dữ liệu văn bản của bạn vào đó. Bạn có thể định dạng Textbox để không thấy đường viền chung quanh.Nhấn chuột phải vào đường viền của Text box và chọn Format Textbox trong menu. Trong tab Colors And Lines, chọn No line trong chỗ chọn màu cho đường viền.


Fig-101.gif


Fig. 101


Fig-102.gif


Fig. 102

60 of 853
Summary: When you need to add a bit of text to an Excel worksheet, the Justify command can make the range look as if it were created with a word processor.
Tóm tắt: Nếu bạn cần gõ 1 đoạn văn bản vào bảng tính, dùng lệnh Justify sẽ làm cho đoạn văn bản này trông giống như soạn thảo trong Word.
 
SPELLCHECK A REGION
KIỂM TRA LỖI CHÍNH TẢ TRONG 1 VÙNG

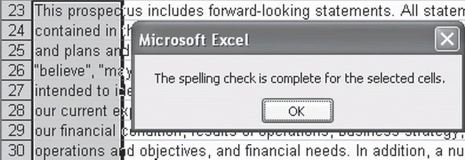
Problem: You want to spellcheck the notes at the bottom of your report, as shown in Fig. 103, but you don’t want to spellcheck the customer names in the report.
Strategy: Select the region to be spellchecked. From the menu, select Tools – Spelling or press the F7 key, as shown in Fig. 104.
Result: Excel will spellcheck just the selected cells, as shown in Fig. 105.

Vấn đề: Bạn muốn kiểm tra lỗi chính tả của các dòng văn bản ở cuối báo cáo, nhưng không muốn kiểm lỗi trong các tên riêng.
Biện pháp: Chọn vùng muốn kiểm tra. Vào menu Tools – Spelling hoặc nhân F7
Kết quả: Excel chỉ thực hiện trong vùng chọn.

Fig-103.gif


Fig. 103

Fig-104.gif


Fig. 104

Fig-105.gif


Fig. 105


USE HYPERLINKS TO CREATE AN OPENING MENU FOR YOUR WORKBOOK
DÙNG HYPERLINK ĐỂ TẠO 1MENU MỞ CHO BẢNG TÍNH

Problem: You have designed a budget workbook. It has various worksheets. Managers throughout the company need to use it, but some of these managers are not entirely comfortable with Excel. A navigation
tool would help them get through the worksheet.
Strategy: Make your first worksheet a menu with hyperlinks.
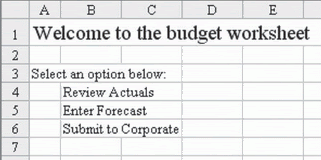
1) Insert an opening worksheet called Menu. Add an entry for each section of the workbook, as shown in Fig. 106.


Vấn đề: Bạn đang làm 1 bảng tính ngân sách và có khá nhiều sheets. Các ông sếp của công ty muốn sử dụng file này, nhưng vài ông trong số đó chẳng thuận thảo gì với Excel. Một công cụ kết nối sẽ giúp mấy ông xem hết các bảng tính.
Giải pháp: Làm 1 menu (hiểu theo nghĩa mục lục) trên sheet thứ nhất với các hyperlink.
1. Chèn 1 sheet mới và đặt tên là Menu. Điền tên mỗi sheet vào 1 ô.


Fig-106.gif


Fig. 106

62 of 853
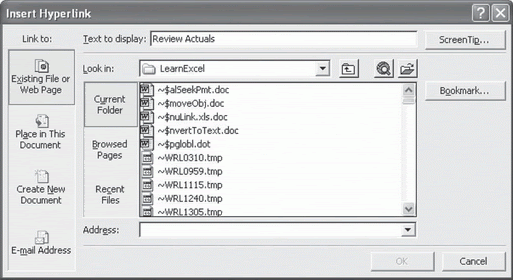
2) Add a hyperlink so that the manager can touch the cell and jump to the section. Select cell B4. From the menu, select Insert – Hyperlink or Ctrl+K. Initially, the Insert Hyperlink dialog will default to link to an Existing File or Web Page, as shown in Fig. 107.
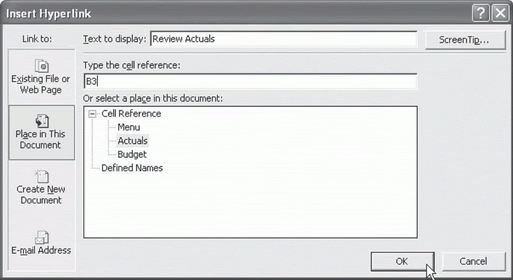
3) On the left side of the dialog, choose the second option, to link to a Place in This Document. The dialog changes to show you all of the worksheets in the document, as shown in Fig. 108.

2. tạo các hyperlink sao cho mấy ông sếp có thể nhấn vào tên sheet ở ô nào sẽ mở sheet có tên đó ra. bắt đầu bằng ô B4: Mở menu Insert – Hyperlink hoặc Ctrl+K. Hộp thoại Hyperlink hiện ra với mặc định liên kết tới 1 file đã tồn tại, hoặc địa chỉ 1 trang Web.
3. Chọn mục thứ 2 bên trái để liên kết tới 1 vị trí trong file. Hộp thoại sẽ liệt kê cho bạn tất cả các sheet đã có trong file.

Fig-107.gif


Fig. 107

Fig-108.gif


Fig. 108

4) Choose a Worksheet. Choose a cell Address. Choose OK.
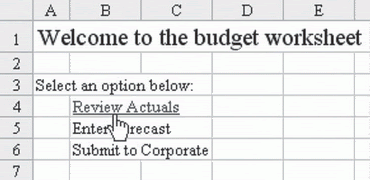
Result: The cell becomes a clickable hyperlink. Clicking on the link will take the manager to the Actuals worksheet. See Fig. 109.
Additional Information: Be sure to provide a hyperlink on the Actuals worksheet to take the manager back to the menu, as shown in Fig. 110.

4. Chọn 1 sheet. Chọn thêm địa chỉ 1 ô, nhấn OK
Kết quả: ô này sẽ trở thành ô liên kết, chỉ cần nhấn vào ô này, sẽ đưa ông sếp đến sheet Actual.
Nói thêm: Phải tạo thêm những liên kết ngược về sheet Menu từ các sheet còn lại.

Fig-109.gif


Fig. 109

Fig-110.gif


Fig. 110
 
Lần chỉnh sửa cuối:
GET QUICK ACCESS TO PASTE SPECIAL
CÁCH TÁC ĐỘNG NHANH ĐẾN LỆNH PASTE SPECIAL

Problem: After reading this book, you routinely find yourself using Edit – Paste Special – Values. It is fairly cumbersome to navigate to this command.

Sau khi đọc sách này, bạn thấy thường xuyên phải dùng Edit - PasteSpecial – Values. Nhưng mở menu theo tuần tự thì khá rắc rối.

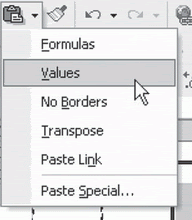
Strategy: Don’t blame me just because you are using these cool features all the time! Relax – there is an even faster way you can go. On the Standard toolbar, there is a Paste button. Next to the Paste button
is a dropdown arrow, as shown in Fig. 111. From the arrow, you can choose to paste one of the six most common options: Paste Values, Paste Formats, No Border, Transpose, Paste Link, and Paste Special.

Biện pháp: Đừng đổ lỗi cho tôi nếu bạn phải dùng chức năng này mọi lúc mọi nơi. Xem đây, có 1 cách nhanh hơn để dùng: Trên thanh công cụ Standard, có 1 nút Paste. Kế bên nút Paste có 1 mũi tên xổ xuống 1 danh sách, trong đó bạn có thể chọn 1 trong 6 cách paste: Paste giá trị, paste định dạng, không đường viền, Xoay chiều dữ liệu (ngang thành dọc, dọc thành ngang), Paste mối liên kết, và Paste Special.

Fig-111.gif


Fig. 111

Summary: Use the dropdown next to the Paste icon to get quick access to the most popular Paste Special options.
Tóm tắt: Chọn trong danh sách xổ xuống từ mũi tên kế bên nút Paste để nhanh chóng thục hiện lệnh Paste Special Values.
 
USE SHIFT KEY TO REVERSE POPULAR TOOLBAR ICONS
DÙNG PHÍM SHIFT ĐỂ ĐẢO NGƯỢC LỆNH GỌI TỪ NÚT LỆNH TRÊN TOOLBAR.

Problem: Your company makes you travel with an antique laptop that has only a low-resolution display. In order to see more than 10 rows in Excel, you accept Excel’s default to display the Standard and Formatting
toolbars on one line. This means that you can only see about 18 of the popular toolbar icons, as shown in Fig. 112.

Vấn đề: Công ty bạn cử bạn đi công tác và cấp cho bạn 1 cái laptop cổ lỗ sĩ với màn hình phân giải kém. Muốn thấy được nhiều hơn 10 dòng của Excel, bạn buộc lòng phải để mặc định 2 toolbar trên 1 dòng. Nghĩa là bạn chỉ thấy cùng lúc 18 nút lệnh trên thanh công cụ.

Fig-112.gif


Fig. 112

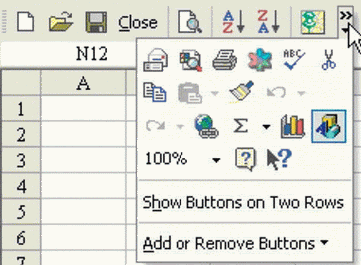
If you use the >> icon to find a hidden icon, you will bring this icon back to the visible set and knock another icon off the toolbar.

Nếu bạn nhấn nút >> để tìm 1 nút bị ẩn, bạn sẽ mang nút đó ra ngoài và dấu đi 1 nút khác.

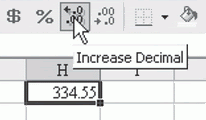
Strategy: Many of Excel’s icons are redundant. There is one icon to increase decimals and another one icon to decrease decimals, as shown in Fig. 113. These toolbar icons do the opposite action from each other. By
holding down the Shift key while using either icon, you can cause Excel to do the reverse action.
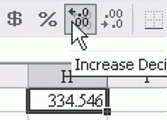
Press the Increase Decimal icon and the number of decimal places shown will increase, as shown in Fig. 114.

Biện pháp: Nhiều nút lệnh của Excel là dư thừa (nếu bạn biết cách dùng). Có 1 nút để tăng số chữ số thập phân và 1 nút khác để giảm (hình 113). Các cặp nút như vậy thực thi những lệnh trái ngược nhau. Bằng cách nhấn Shift khi sử dụng các nút này, bạn có thể bắt Excel thực hiện lệnh ngược lại.
Nhấn nút Increase Decimal, và số chữ số thập phân tăng lên như hình 114.


Fig-113.gif


Fig. 113

Fig-114.gif


Fig. 114

66 of 853
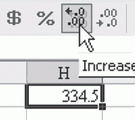
Hold down the Shift key and press the Increase Decimal icon and the number of decimals will decrease! Fig. 115 shows what you get after holding down Shift and pressing Increase Decimal twice.
Provided that you can remember the Shift key trick, you don’t need the Decrease Decimal icon on the toolbar.

Nhấn giữ phím shift và click nút Increase Decimal lần nữa xem, Số chữ số thập phân sẽ giảm. Hình 115 cho thấy kết quả sau khi làm điều đó 2 lần. Vậy nếu bạn nhớ cách sử dụng phím Shift, bạn chỉ cần hiện lên thanh công cụ 1 nút và không cần nút thứ hai.
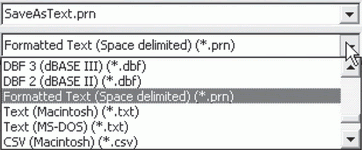
Fig-115.gif


Fig. 115

Additional Details: The Shift key works with the following icons:
• Sort Ascending and Descending
• Align Left and Right
• Decrease and Increase Indent
You can Sort Descending by holding down Shift while using the Sort Ascending button, as shown in Fig. 116.
Align Left and Align Right can be reversed using the Shift key, as shown in Fig. 117.

Nói thêm: Phím Shift có tác dụng với các cặp nút sau:
- Sắp thứ tự tăng dần và sắp thứ tự giảm dần.
- Canh lề trái và phải
- Tăng và giảm lề của ô.
Thí dụ như bạn có thể sắp thứ tự giảm dần bằng cách nhấn nút sắp thứ tự tăng dần như hình 116, canh lề phải bằng cách nhấn nút lề trái như hình 117

Fig-116.gif


Fig. 116

Fig-117.gif


Fig. 117
Using the Shift key can also reverse the Decrease and Increase Indent, as shown in Fig. 118.

Bạn cũng có thể tăng lề ô bằng cách nhấn nút giảm lề ô như hình 118

Fig-118.gif


Fig. 118

Summary: Knowing which toolbar icons can be reversed will allow you to avoid hunting for the opposite icon in the infrequently used icon area. Or, you can customize your toolbars to remove one of each pair of redundant icons.

Tóm tắt: Biết những nút nào có thể dùng shift để thực hiện lệnh ngược lại, bạn sẽ không phải đi tìm nút ngược lại trong số những nút bị ẩn, hoặc bạn có thể dẹp bớt 1 trong 2 nút ngược nhau trên thanh công cụ.
 
CREATE A MENU OR A TOOLBAR OF YOUR FAVORITE ICONS
TẠO 1 MENU HOẶC 1 THANH CÔNG CỤ VỚI NHỮNG NÚT NHẤN THƯỜNG DÙNG.

Problem:
You rarely use half of the icons in the Standard or Formatting toolbar. Why not create a Steve-O toolbar with just your favorites?
Strategy:

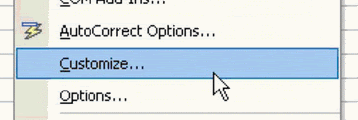
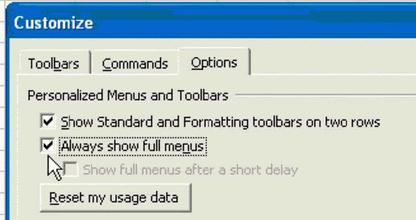
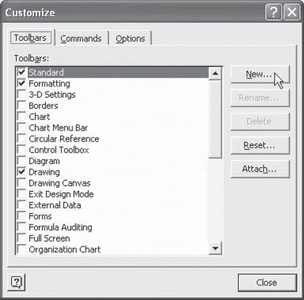
1) Choose View – Toolbars – Customize. From the Toolbars tab, select New…, as shown in Fig. 119.
Vấn đề: Bạn ít có dùng đến gần 1 nửa các nút trong 2 thanh công cụ. Tại sao không tạo ra 1 thanh công cụ với chỉ các nút thường dùng?
1. Vào menu View – Toolbar – Customize. Ở tab tool bar, chọn New.

Fig-119.gif


Fig. 119

f 853

2) Give the new toolbar a name, as shown in Fig. 120. You should probably only use Steve-O if your name is actually Steve.
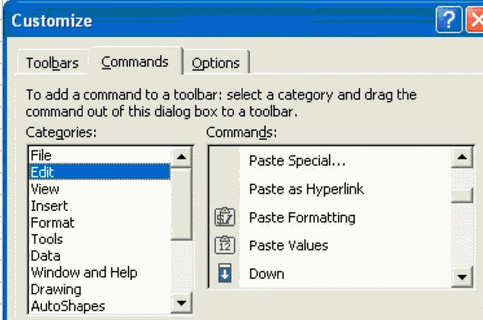
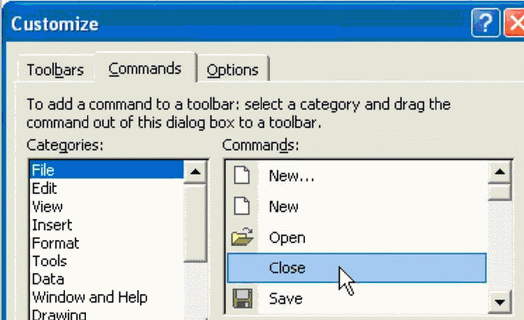
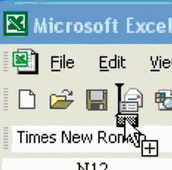
3) As shown in Fig. 121, a new toolbar will appear without any icons. In the Customize dialog, choose the Commands tab. Drag any icon(s) you use regularly from the Commands tab to the new bar.

2. Đặt tên cho thanh công cụ, như hình 120. Bạn chì nên đặt tên Steve-O nếu tên bạn đúng là Steve.
3. Như hình 121, 1 thanh công cụ xuất hiện và chưa có nút nhấn nào.

Fig-119.gif


Fig. 120


Fig-121.gif


Fig. 121


Additional Information:
Consider some of these unusual but useful icons:
If you routinely paste formulas as values, the Paste Values icon (located in the Edit category) will speed up the process for you. See Fig. 122 below.

Nói thêm: Chú ý những nút khác thường nhưng hữu dụng sau: Nếu bạn thường xuyên Paste value, nút nhấn Paste value chứa trong nhóm lệnh Edit, sẽ tăng tốc độ thao tác của bạn.

Fig-122.gif


Fig. 122


The Select Visible Cells icon will gather just the total lines when your subtotals are in Group mode. This icon will save you from choosing Edit – Go To – Special – Visible Cells only. It is located near the end of the Edit category, as shown in Fig. 123.

Nút nhấn Select Visible Cells (chọn những ô có mặt – không bị ẩn) sẽ tóm lấy những dòng có tính tổng khi bạn đang trong tình trạng có xài SubTotal và group. Nút nhấn này tiết kiệm thời gian cho bạn khỏi phải chọn tuần tự Edit – Go To – Special – Visible Cells only. NÚt này nằm gần cuối nhóm nút lệnh Edit.

Fig-123.gif


Fig. 123


As shown in Fig. 124, selecting the Cycle Font Color icon will change the font to a different color with each click. If you just need your cells to be different colors but don’t want the burden of selecting the color, this is
for you. This icon is located near the top of the Format category. Choose Symbol from the Insert category if you routinely have to use unusual symbols. The icon provides a shortcut to the Symbol dialog. See Fig. 125.

Xem hình 124, chọn nút nhấn Cycle Font Color sẽ giúp bạn đổi màu chữ mỗi lần click vào nó. Nếu bạn muốn các ô nào đó có màu khác nhưng không muốn mất công chọn màu, hãy click nó. Nút này nằm ở gần đầu của nhóm lệnh Format. Chọn thêm nút Insert Symbol trong nhóm lệnh Insert để dùng nếu bạn thường dùng các ký hiệu. Nút nhấn này sẽ mở hộp thoại Insert Symbol.

Fig-124.gif


Fig. 124


Fig-125.gif


Fig. 125


As shown in Fig. 126, select Pivot Labels if you do a lot of pivot tables. This icon will select just the label areas of a pivot table for easy formatting. The icon is located halfway through the Data category.
Additional Information:
Do you find it hard to remember the meanings of these icons? You can have descriptive text appear with any icon. While you are in Customize mode, right-click any icon in any toolbar.
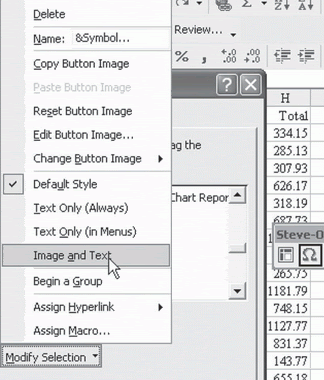
In the right-click menu, choose to always display Image and Text, as shown in Fig. 127.

Chọn nút Pivot Table Label nếu bạn thường dùng Pivot Table. Nhấn nút này sẽ giúp bạn chọn chỉ những ô chứa tiêu đề dòng, cột, nhằm định dạng lại. Nút này nằm ở khoảng giữa của nhóm lệnh Data.
Nói thêm nữa: Bạn có khó khăn khi phải nhớ ý nghĩa từng nút không? Bạn có thể tạo những câu mô tả nút nhấn để xuất hiện cùng với mọi nút nhấn. Khi đang trong trạng thái Customize, nhấn chuột phải vào bất kỳ nút nhấn nào trên bất kỳ thanh công cụ nào. Trong menu tắt, chọn always display Image and Text (hình 127)

Fig-126.gif


Fig. 126


Fig-127.gif


Fig. 127


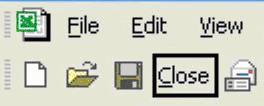
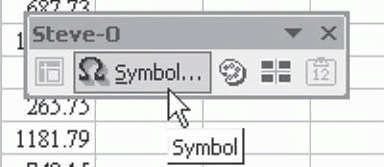
The icon will appear with its text in the toolbar, as shown in Fig. 128. You can add text to any toolbar button using this method.

Cái nút nhấn sẽ hiện trên thanh công cụ kèm theo đọn từ mô tả lệnh. Bạn có thể làm cách này cho mọi nút nhấn nào bạn muốn.

To be cotinued,
 
Lần chỉnh sửa cuối:
CREATE A MENU OR A TOOLBAR OF YOUR FAVORITE ICONS (continue)
TẠO 1 MENU HOẶC 1 THANH CÔNG CỤ VỚI NHỮNG NÚT NHẤN THƯỜNG DÙNG.
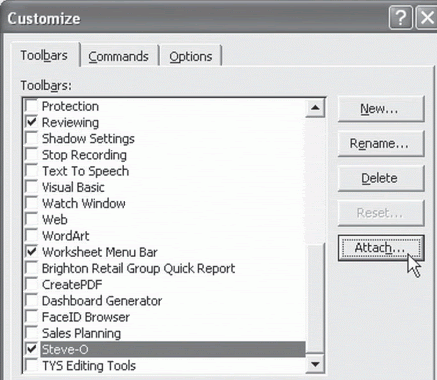
Additional Details: If you would like to send your custom toolbar along with the workbook, you can attach it to the workbook. On the Customize dialog, choose the Toolbars tab. Select the Steve-O toolbar and choose
the Attach button, as shown in Fig. 129.

Nói nữa: Nếu bạn muốn gán thanh công cụ này vào bảng tính, bạn có thể dùng lệnh Attach: Trong hộp thoại Customize, chọn tab Tollbars, Chọn thanh công cụ mới tạo và nhấn nút Attach.

Fig-128.gif


Fig. 128

Fig-129.gif


Fig. 129
72 of 853
You can choose which custom toolbars should be attached to this workbook, as shown in Fig. 130.

Như hình 130, bạn có thể gắn mọi thanh công cụ tự tạo vào bảng tính như hình 130.

Fig-86.jpg


Fig. 130

Summary: To create a tool bar that has the icons you use most, choose View – Toolbars – Customize.

Tóm tắt: Dùng View – Toolbars – Customize để tự tạo những thanh công cụ với những nút nhấn thường dùng.

 
Lần chỉnh sửa cuối:
RESTORE YOUR MENUS AFTER CUSTOMIZING
PHỤC HỒI MENU SAU KHI QUẬY.

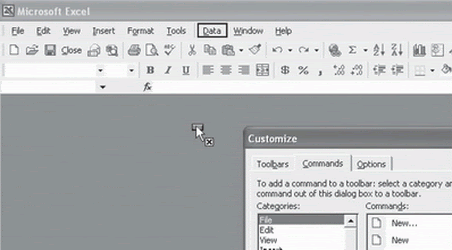
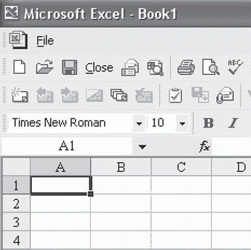
Problem: You were experimenting with customizing the toolbars in Excel. After using Tools – Customize, you noticed that you could drag the Data menu right off the menu bar, as shown in Fig. 131.
Vấn đề: Bạn đã có kinh nghiệm thực hiện việc tuỳ chọn thanh công cụ trong Excel. Sau khi sử dụng Tools – Customize, BẠn thấy có thể xoá bỏ luôn menu Data ra khỏi thanh Menu

Fig-131.gif


Fig. 131

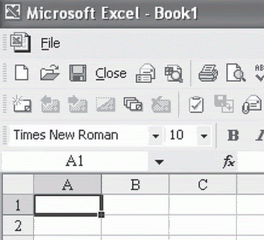
For some unknown reason, you then removed the remaining menu items from the toolbar, leaving only the File menu. You did this either because you were bored or perhaps as an April Fool’s day prank on your manager. As shown in Fig. 132, it would be pretty startling to see this shortened menu in Excel. All the while, you figured this was good fun, because you thought that you could simply quit Excel, restart Excel, and then have the menus back. However, your gut wrenches as you re-open Excel only to learn that the changes to the menu bar are permanent, as shown in Fig. 133!

Vì lý do nào đó, bạn đã xoá dẹp bỏ mọi thực đơn trên thanh Menu, trừ Menu File. Bạn làm vậy có thể bạn đang chán đời hoặc là 1 trò nghịch tai quái trên máy tính của xếp. Như hình 132, nó trở thành 1 Menu quá đơn giản. Thoạt tiên bạn nghĩ đây chỉ là 1 trò đùa, và bạn nghĩ có thể chỉ cần đóng Excel, mở lên lại là trở về tình trạng cũ. Thế rồi bạn giật mình khi mở Excel lên lại và thấy rằng sự thay đổi đó là vĩnh viễn.

Fig-132.gif


Fig. 132

Fig-133.gif


Fig. 133

74 of 853
You don’t even have a Tools menu to select Customize from!

Bây giờ thậm chí bạn không có menu Tools để mà vào Customize.

Strategy: Relax.
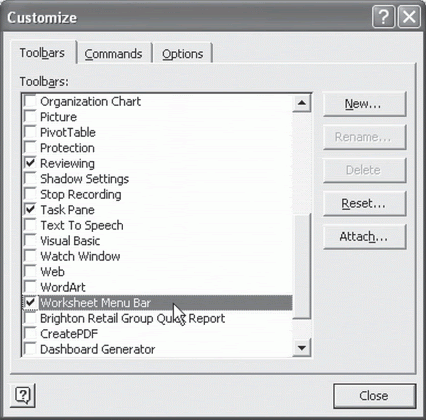
1) Right-click the menu bar and select Customize.
2) In the Customize dialog, go to the Toolbars tab. Scroll down to find the Worksheet Menu bar option. Highlight the Worksheet Menu Bar by clicking on that option, as shown in Fig. 134.

Biện pháp: Yên tâm đi.
- Nhấn chuột phải vào thanh menu, và lại chọn Customize.
- Trong hộp thoại Customize, vào tab Toolbars. Kéo xuống xho đến khi thấy mục Worksheet Menubar. Bôi sáng dòng này bằng cách click vào nó.

Fig-134.gif


Fig. 134

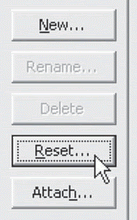
3) As shown in Fig. 135, choose the Reset button along the right side of the dialog.
4) Confirm that you really do want to reset the menu bar, as shown in Fig. 136.
The menu bar will return to its original state. See Fig. 137.

- Như hình 135, nhấn nút Reset bên phải.
- Xác nhận việc phục hồi
Thanh Menu trở về tình trạng nguuyên thuỷ.

Fig-135.gif


Fig. 135

Fig-136.gif


Fig. 136

Fig-137.gif


Fig. 137

76 of 853
Summary: Many Excel users have been scared away from customizing their toolbars when they accidentally deleted something important. There is nothing to be concerned about. You can always restore the factory
defaults by using the method discussed in this chapter.

Tóm tắt: Nhiều người dùng Excel đã hoảng sợ khi tuỳ biến thanh công cụ của họ và lỡ tay xoá bỏ 1 cái gì đó quan trọng. không có gì phải lo sợ cả, bạn có thể phục hồi về tình trạng nguyên thuỷ của Excel bằng cách như trên.

____________________________________________________________

1000posts.gif

 
Lần chỉnh sửa cuối:
QUICKLY COPY A FORMULA TO ALL ROWS OF DATA
SAO CHÉP CÔNG THỨC XUỐNG MỌI DÒNG DỮ LIỆU.

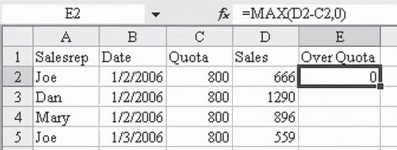
Problem: As shown in Fig. 138, you have a worksheet with 5,000 rows of data. You enter a formula in a new column and need to copy it down to all of the rows. Is there a faster way to copy the formula down to all rows?
Strategy: Double-click the Fill handle. This shortcut will copy the formula down until Excel encounters a blank cell in column D or F. The Fill handle is the square dot in the lower right corner of the cell pointer box. When you hover your mouse pointer over the Fill handle, it changes to a cross, as shown in Fig. 139.

Vấn đề: Như hình 138, bạn có 1bảng tính 5.000 dòng dữ liệu. Bạn vừa gõ 1 công thức ở 1 cột mới và muốn sao chép công thức này xuống mọi dòng bên dưới. Có cách nào làm thật nhanh chóng không?

Biện pháp: Click đôi vào cái Fill Handle. Cách này sẽ sao chép công thức xuống tới chừng nào Excel thấy 1 ô trống trong cột D hoặc F. Nút Fill Handle là cái dấu chấm hình vuông ở góc dưới bên phải của ô chọn. khi bạn rà chuột lên nút này, nó sẽ chuyển thành hình chữ thập nhỏ như hình 139.

Fig-138.gif


Fig. 138

Fig-139.gif


Fig. 139

If there is data in the cell to the left of E2, then Excel will copy the formula based on the first blank cell in column D. If there is no data in D2, but there is data in F2, then Excel will copy down to the first blank cell
in column F.

Nếu có dữ liệu bên trái của E2, Excel sẽ thực hiện sao chép xuống đến ô trống đầu tiên ở cột D. Nếu không códữ liệu ở D2, nhưng có dữ liệu ở F2, Excel sẽ sao chép công thức xuống đến ô trống đầu tiên ở cột F.

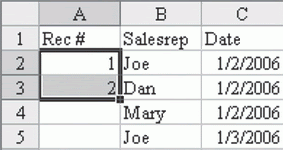
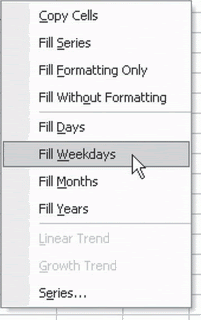
Additional Information: The Fill handle can be used to extend a series. Select two cells that Excel can use to extrapolate the series. Doubleclick the Fill handle to extend the series down to all rows. In Fig. 140, the record numbers will continue in a 1, 2, 3, 4 sequence. There are other Fill possibilities. One cool technique is to Fill Weekdays. Enter a starting date in one cell. Place the cell pointer in that cell. Right-clickand drag the Fill handle down several cells. The tooltip will indicate that you are filling the series with daily dates. When you release the mouse button, you will have several options to choose from, as shown in Fig. 141. Select Fill Weekdays to fill in only Monday through Fridays.

Nói thêm: Cái nút Fill Handle cóthể dùng để mở rộng 1 dãy số. Chọn 2 ô kế nhau sao cho Excel có thể mở rộng dãy số. Doubled-click cái Fill Handle để fill chuỗi số xuống mọi dòng. Ở hình 140, số thứ tự sẽ được điền vào theo thứ tự 1, 2, 3, 4. Còn 1 khả năng khác nữa của nút Fill Handle. Một kỹ năng fill là chỉ fill ngày làm việc. Hãy gõ 1 ngày bắt đầu vào 1 ô. Khi ô chọn là ô vừa gõ, Dùng chuột phải kéo nút Fill Handle xuống. Trong khi kéo thì cái tool tip nhỏ nhỏ cho thấy đang fill ngày tuần tự. Khi buông chuột ra, bạn sẽ thấy có nhiều chọn lựa như hình 141. Chọn Fill Weekdays để chỉ điền những ngày từ thứ 2 đến thứ sáu.

Fig-140.gif


Fig. 140

Fig-141.gif


Fig. 141

78 of 853
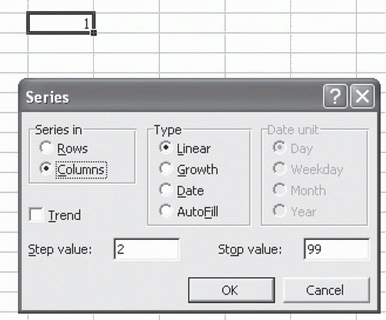
Additional Information: The Fill handle is a shortcut to default settings in the Edit – Fill – Series command. Enter a cell, select that cell and choose Edit – Fill – Series to display a dialog where you can specify any type of series. As shown in Fig. 142, the dialog will fill the odd numbers from 1 to 99, down a column starting with the active cell.

Nói thêm nữa: Nút Fill handle là 1 cách tắt để cài đặt mặc định cho lệnh Edit – Fill – Series. Gõ vào 1 ô, chọn ô đó và chọn Edit – Fill – Series để hiện ra hộp thoại nhằm chọn lựa bất kỳ kiểu dãy số nào. Hình 142 cho thấy cách điền các số lẻ từ 1 đến 99, xuống 1 cột bắt đầu từ ô đang chọn.

Fig-142.gif


Fig. 142

Summary: Learn to double-click the Fill handle to quickly copy a formula down to all cells in a range of data.
Tóm tắt: Học cách click đôi vào Nút Fill handle để sao chép nhanh công thức xuống mọi dòng có dữ liệu bên dưới.
 
Lần chỉnh sửa cuối:
QUICKLY TURN A RANGE ON ITS SIDE
ĐỔI CHIỀU 1 VÙNG CHỌN NHANH CHÓNG

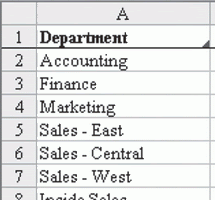
Problem: As shown in Fig. 143, you have a column of 20 dement names. You need to build a spreadsheet with those names going across row 1.

Strategy: Use the Paste Special – Transpose option to turn the range on its side.
1) Highlight the dement names in column A.
2) From the menu, select Edit – Copy to copy the cells to the clipboard.
3) Move the cell pointer to a blank area of your worksheet. In this case, perhaps cell C1.
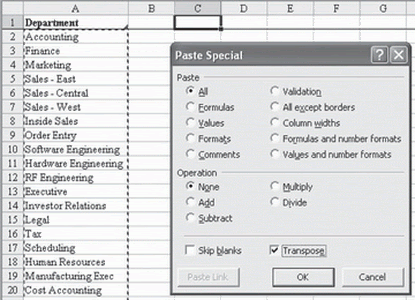
4) From the menu, select Edit – Paste Special. In the Paste Special dialog box, choose the Transpose option, as shown in Fig. 144. Choose OK.

Vấn đề: Như hình 143, bạn có 1 cột với 20 cái tên. Bạn muốn tạo 1 sheet mới với những tên đó xoay ngang ở dòng 1.

Biện pháp: Dùng Paste Special – Transpose để xoay vùng dữ liệu.
- Đánh dấu những cái tên đó ở cột A.
- Mở Menu Edit Copy để sao vùng này vào bộ nhớ tạm.
- Dời ô chọn đến 1 ô khác của bảng tính. Trường hợp này, có lẽ ta sẽ chọn C1.
- Mở Menu Edit, chọn Paste Special. Trong hộp thoại hiện ra, click chọn Transpose, như hình 144, và OK.

Fig-143.gif


Fig. 143

Fig-144.gif


Fig. 144
80 of 853
Result: As shown in Fig. 145, the dement names from column A are turned sideways and fill cells C1 to Z1.
Gotcha: The columns that you paste to will not automatically resize to fit the data. Select C1:Z1 and from the menu, choose Format – Columns – Auto Fit Selection.
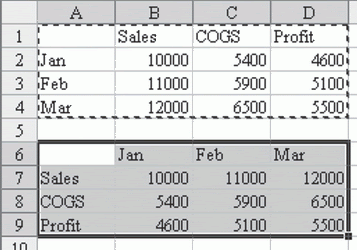
Additional Information: The Paste Special Transpose technique can also be used to convert a horizontal row of numbers into a column. The technique can also be used to turn a rectangular range on its side. In Fig. 146, Range A1:D4 was transposed to Range A6:D9.

Kết quả: Như hình 145, những cái tên cột A đã xoay ngang từ C1 đến Z1.
Ghi chú: Những cột mới paste vào sẽ không tự động mở rộng cho vừa chiều ngang, hãy chọn vùng C1:Z1 và chọn trong menu format mục Columns – Auto fit Selection.

Nói thêm: Paste Special Transpose cũng có thể chuyển dữ liệu từ hàng ngang thành cột dọc. Kỹ năng này cũng có thể dùng để xoay chiều vùng dữ liệu chữ nhật nhiều dòng và cột. Như hình 146, vùng A1:D4 đã được xoay thành vùng A6:D9.

Fig-145.gif


Fig. 145

Fig-146.gif


Fig. 146

Summary: Using the Paste Special Transpose technique is useful to quickly turn a range of values on its side.

Tóm tắt: Dùng Paste Special Transpose để xoay chiều 1 vùng dữ liệu.
 
Lần chỉnh sửa cuối:
STOP EXCEL FROM AUTOCORRECTING CERTAIN WORDS
NGĂN EXCEL KHÔNG CHO TỰ ĐỘNG SỬA LỖI 1 SỐ TỪ.

Problem: Every time you type the name of your WYA Division, as shown in Fig. 147, Excel changes “WYA” to “WAY”, as shown in Fig. 148. It is impossible to type WYA without entering it as a formula: =”W”&”Y”&”A”.
Strategy: There is a large list of words that are automatically replaced as you type. Excel added this feature to correct common mistypings. This is a good feature, unless you routinely have to type one of the words that
Excel thinks is wrong. Luckily, you can edit this list without turning it off.
From the Tools menu, select AutoCorrect options. On the AutoCorrect dialog, go to the AutoCorrect tab. Look
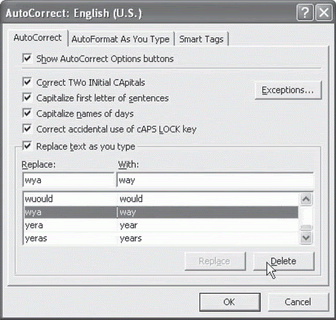
in the Replace Text as You Type section. Scroll down to the list to find where it replaces WYA with WAY. Select that line and click Delete, as shown in Fig. 149.

Vấn đề: Mỗi khi bạn gõ chữ viết tắt WYA cúa 1 bộ phận, Excel lại tự đổi “WAY” thành “WAY” như hình 147 và 148. Không thể nào gõ những chữ này trừ khi gõ 1 công thức =”W”&”Y”&”A”
Biện pháp: Có 1 danh sách dài những từ mà Excel sẽ tự động sửa khi bạn đánh vào. Excel dùng danh sách này để sửa những lỗi chính tả thường gặp. Đây là 1 tiện ích tốt, trừ khi bận muốn gõ đúng cái từ mà Excel cho là sai. May thay, bạn có thể sửa cái danh sách này mà không cần tắt nó đi.
Mở Menu Tools, chọn Autocorrect Options. Trong hộp thoại hiện ra, mở tab AutoCorrect. Ngó vào vùng Replace Text as You Type. Kéo xuống cho đến khi thấy chỗ Excel sửa WYA thành WAY. Clickchọn dòng đó và nhấn Delete như hình 149.

Fig-147.gif


Fig. 147

Fig-148.gif


Fig. 148

Fig-149.gif


Fig. 149

82 of 853
Summary: You can edit how Excel will autocorrect words without turning off the feature by going to Tools – AutoCorrect – Options and removing the selected lines from the list.
Tóm tắt: bạn có thể sửa danh sách các từ được Excel tự động sửa mà không cầnb tắt chức năng này bằng cách sửa trong Menu Tools - Autocorrect Options.
 
Lần chỉnh sửa cuối:
USE AUTOCORRECT TO ENABLE A SHORTCUT
DÙNG AUTOCORRECT ĐỂ TẠO NHỮNG TỪ GÕ TẮT.

Problem: You work for John Jacob Jingleheimer Schmidt. It is frustrating to type this name continuously.
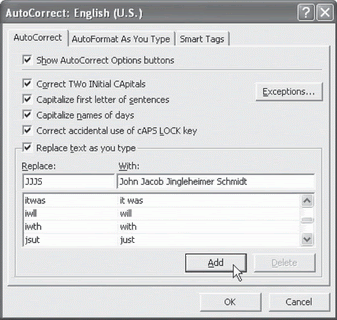
Strategy: Set up an AutoCorrect entry to replace JJJS with John Jacob Jingleheimer Schmidt.
From the menu, select Tools – AutoCorrect options. In the Replace section, type JJJS. In the With section, type the complete name, click Add, as shown in Fig. 150.

Vấn đề: Bạn đang làm việc cho Công ty John Jacob Jingleheimer Schmidt. Thật là nản nếu phải gõ đi gõ lại cái tên công ty đầy đủ này.
Giải pháp: Cài đặt 1 từ tắt cho mục AutoCorrect để thay thế JJJS bằng John Jacob Jingleheimer Schmidt.
Vào lại mục Tools - Autocorrect Options trong Menu Tools. Trong vùng Replace, gõ JJJS. Trong vùng With, gõ John Jacob Jingleheimer Schmidt, nhấn Add.

Fig-150.gif


Fig. 150

Result: Typing “JJJS”, as shown in Fig. 151, will cause the just the replacement word to appear.
After typing a Space or hitting Enter to finish the cell, “JJJS” will change to the complete name, as shown in Fig. 152.
Summary: Using Tools – AutoCorrect and adding a shortcut for a long or difficult word will cause AutoCorrect to fill it in for you.

Kết quả: khi gõ JJJS vào như hình 151, sau khi gõ 1 dấu cách hoặc nhấn Enter, JJJS sẽ đổi thành nguyên tên như hình 152.

Fig-151.gif


Fig. 151

Fig-152.gif


Fig. 152

Tóm tắt: Dùng Tools – Autocorrect và thêm vào danh sách 1 số các từ gõ tắt cho 1 từ hoặc 1 nhóm từ dài và khó đánh. Excel sẽ làm điều đó cho bạn.

 
Lần chỉnh sửa cuối:
WHY WON’T THE TRACK CHANGES FEATURE WORK IN EXCEL?
TẠI SAO KHÔNG NÊN DÙNG CÔNG CỤ TRACK CHANGES TRONG EXCEL

Problem: After using Tools – Track Changes, you cannot insert cells.
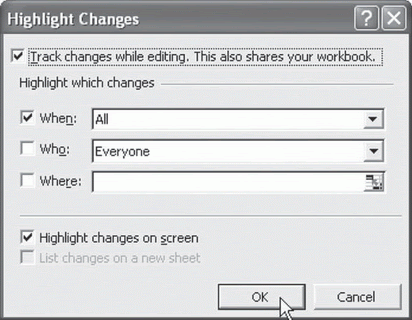
Strategy: Track Changes is a great feature in Word. However, when you turn on Track Changes in Excel, Microsoft automatically makes your workbook a shared workbook. If you select Tools – Track Changes, Excel
will share your workbook, as shown in Fig. 153.
Vấn đề: Sau khi sử dụng công cụ Tools- Track Changes, bạn không thể insert cell.
Giải thích: TrackChanges là 1 công cụ mạnh trong Word. Dù vậy, khi bật chế độ Track Changes trong Excel, Excel sẽ share bảng tính của bạn như hình 153.

Fig-153.gif


Fig. 153

84 of 853
The shared workbook function in Excel has so many limitations that it is nearly impossible to use. Once you share a workbook, you cannot do any of the following tasks:
• Insert blocks of cells
• Delete worksheets
• Merge or unmerge cells
• Change conditional formatting or data validation
• Create charts
• Insert drawing objects, hyperlinks, scenarios
• Use automatic subtotals
• Use pivot tables
• Record or edit macros
• Enter CSE or array formulas
• Use data tables
It is possible that a novice Excel user might never use the above features. It is even possible that before you bought this book, you never used those features. However, sharing a workbook makes it virtually unusable for an intermediate Excel user. There is no strategy for this. Unless your changes will only involve radically simple worksheet changes, avoid the Track Changes and Share Workbook options.
Summary: Using Track Changes in Excel should be avoided.

Khi bảng tính bị share, nó sẽ bị những hạn chế và gần như không thể sử dụng. Một khi share bảng tính, bạn không thể thực hiện những việc sau:

- Insert cell
- Xoá sheet
- Merge cells hoặc gỡ bỏ Merge cells.
- Thay đổi các định dạng có điều kiện hoặc các ràng buộc bởi validation.
- Tạo biểu đồ.
- Insert những object, hyperlink hay scenarios,
- Dùng SubTotal tự động.
- Tạo Pivot table
- Ghi lại hay tạo Macro hay sửa macro.
- Dùng hàm hay công thức mảng
- Dùng công cụ Data Table.

Có thể 1 anh sử dụng Excel tập sự sẽ chả bao giờ dùng những công cụ trên. Thậm chí khi chưa mua sách này (Learn Excel with Mr. Excel), bạn chưa hề dùng đến những công cụ ấy. Dù vậy, Share bảng tính làm bó tay mấy anh xài Excel cỡ trung bình và cấp cao. Vậy trừ khi những thay đổi chỉ thực hiện trong bảng tính đơn giản, đừng dùng chức năng hay công cụ Track Changes.
Tóm tắt: tránh dùng chức năng Track Changes trong Excel.
 
Lần chỉnh sửa cuối:
COPY CELLS FROM ONE WORKSHEET TO MANY WORKSHEETS
SAO CHÉP TỪ 1 SHEET SANG NHIỀU SHEETS KHÁC.

Problem: You have twelve monthly worksheets in a workbook. You’ve made changes to January and now need to copy the changes to the other eleven worksheets.
Strategy: After you’ve successfully made changes to January, follow these steps:
1) Select the January worksheet. While holding down the Shift key, select the December worksheet. This will select all twelve worksheets and the January worksheet will be the active sheet.
Note: If your changes are in a middle sheet, such as April, then the process is different. First, click the April worksheet. Next, Shift+Click the December sheet, and then Ctrl+Click the January, February, March sheets.
2) Select the cells that you want to copy. If the cells are not adjacent, select the first range and then Ctrl+ select the remaining ranges.
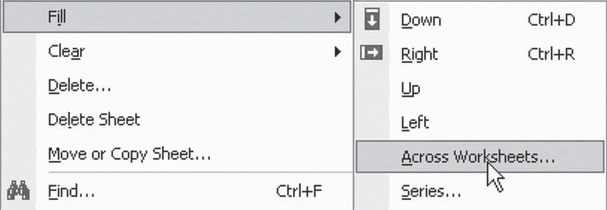
3) From the menu, select Edit – Fill – Fill Across Worksheets, as shown in Fig. 154.
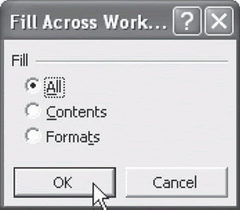
4) From the dialog, as shown in Fig. 155, select if you want to copy values, formats, or both.

Fig-154.gif


Fig. 154

Fig-155.gif


Fig. 155

Vấn đề: Bạn có 12 sheet cho 12 tháng dữ liệu. Bạn đã thực hiện 1 số thay đổi cho sheet tháng 1 và muốn sao chép những thay đổi đến 11 sheet còn lại.
Giải pháp: Sau khi sửa đổi hoàn chỉnh cho tháng 1, làm những bước sau:
1. Chọn sheet tháng 1. Rồi nhấn giữ phím shift, click chọn sheet tháng 12. Bước này nhằm chọn cùng lúc 12 sheet trong khi sheet tháng 1 là sheet hiện hành.
Chú ý: Nếu những thayđổi của bạn đã làm trong 1 sheet ở khoảng giữa các sheet, giả sử sheet tháng 4, quy trình chọn hết các sheet có hơi khác: Trước tiên click chọn sheet tháng 4, sau đó Shift và click sheet tháng 12. Cuối cùng là Ctrl và click lần lượt các sheet tháng 1, 2 và 3.
2. Chọn những ô cần copy. nếu những ô này không liền kề nhau, hãy nhấn Ctrl trong khi chọn.
3. Mở menu Edit, chọn Fill – Fill across Worksheets, như hình 154
4. Trong hộp thoại hiện ra như hình 155, chọn nếu bạn muốn chép giá trị, định dạng, hoặc cả 2.
86 of 853
Gotcha: After this, right-click any sheet tab and select Ungroup. If you fail to ungroup, any changes you make to the active worksheet will be made to all worksheets.
Additional Details: This command is fairly difficult to use. You have to be able to group sheets and then make the sheet with the changes to copy the active (top) sheet. The above steps are designed to help select
all sheets. If you need to copy from March to only June, September, December, then you might do this:
1) Select March to make it the active sheet.
2) Ctrl+ select June to add to the group.
3) Ctrl+ select September to add to the group.
4) Ctrl+ select December to add to the group.
5) Do the Edit – Fill – Fill Across Worksheets.
Summary: To copy cells from one worksheet to several other worksheets, select the worksheets to copy to, including the worksheet that has the data to copy. With that worksheet as the active sheet, select the data to copy, and then select Edit – Fill – Fill Across Worksheets.

Ghi chú: Sau khi làm xong, nhấn chuột phải vào sheet tab bất kỳ và chọn Ungroup. Nếu không, mọi thay đổi bạn sắp thực hiện cho sheet hiện hành sẽ xuất hiện trong mọi sheet.
Nói thêm: Lệnh này của Excel hơi khó thực hiện. Bạn phải group các sheet cần thiết và để sheet với những thay đổi cần sao chép làm sheet hiện hành. Những bước như trên sẽ chọn tất cả các sheet. Nếu bạn cần sao chép từ sheet tháng 3 cho chỉ 3 sheet tháng 6, 10, và 11; bạn phải làm như sau:
- Chọn sheet tháng 3
- Ctrl và chọn sheet tháng 6 cho thêm vào nhóm
- Ctrl và chọn sheet tháng 10 cho thêm vào nhóm
- Ctrl và chọn sheet tháng 11 cho thêm vào nhóm
- Thi hành lệnh Edit – Fill – Fill Across Worksheets.

Tóm tắt: Để sao chép các ô từ 1 sheet đến nhiều sheet khác, Chọn hết các sheet cần chép đến và sheet cần sao, chọn các ô cần sao rồi thực hiện lệnh Edit – Fill – Fill Across Worksheets.

 
Lần chỉnh sửa cuối:
HAVE EXCEL TALK TO YOU
HÃY ĐỂ EXCEL ĐỌC DỮ LIỆU CHO BẠN.

Problem: You have many numbers to enter, but you are notoriously bad at keying data.
Strategy: Have Excel’s speech utility speak each number as you complete an entry.
Note: This feature is not in the default install. The first time you try to use it, you may need your installation CDs.
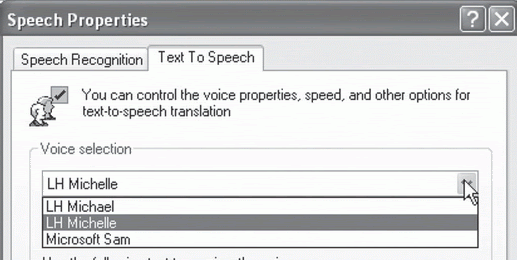
1) Before trying the Speech option, go to the Windows Control Panel and choose Speech. On the Text to Speech tab, there should be three different voices available, as shown in Fig. 156. Choose the one that is the least annoying to you.
2) Back in Excel, select Tools – Speech – Show Text to Speech toolbar from the menu, as shown in Fig. 157.
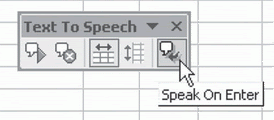
3) Choose the Speak On Enter icon in the Text To Speech toolbar, as shown in Fig. 158. As you enter new cells, the computer voice will speak the entry, allowing you to audibly check the entries.
Vấn đề: Bạn có nhiều con số phải gõ vào bảng tính, mà bạn nổi tiếng là hay gõ sai những phím số.
Biện pháp: Hãy để Excel đọc những con số bạn vừa gõ xong.
Chú ý: Chức năng này mặc định không có sẵn khi cài đạt Office. Lần đầu sử dụng nó, có thể bạn phải cho đĩa cài đặt Office vào.
1. Trước khi thử chức năng này, hãy vào Control Panel của Windows, chọn Speech. Trong tab Text to Speech, sẽ có sẵn 3 giọng nói như hình 156. Chọn 1 giọng nào mà ít khó chịu nhất đối với bạn.
2. Trở lại Excel, vào Menu Tools chọn Speech – Show Text to Speech toolbar như hình 157,
3. Nhấn biểu tượng Speak on Enter trên thanh công cụ này theo hình 158. Khi nhấn Enter sau khi gõ dữ liệu vào ô, âm thanh của máy sẽ phát lên, đọc lại dữ liệu mới nhập vào, và bạn có thể kiểm tra dữ liệu bằng âm thanh.

Fig-156.gif


Fig. 156

Fig-157.gif


Fig. 157

Fig-158.gif


Fig. 158
88 of 853
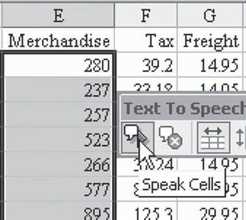
4) You can also select a range of cells and, as shown in Fig. 159, press the Speak Cells button to have all of the cells read to you.
4. Bạn có thể chọn 1 vùng nhiều ô và nhấn biểu tượng Speak cells như hình 159 để Excel đọc lần lượt hết các ô đang chọn.

Fig-159.gif


Fig. 159

Summary: Excel’s text-to-speech tools can help you to verify your data entry.
Tóm tắt: Công cụ Text to speech của Excel giúp bạn kiểm tra bằng giọng nói dữ liệu nhập vào.
 
Lần chỉnh sửa cuối:
ENTER SPECIAL SYMBOLS
INSERT NHỮNG KÝ HIỆU ĐẶC BIỆT
Problem: You work in the music business. You routinely have to enter copyright symbols.
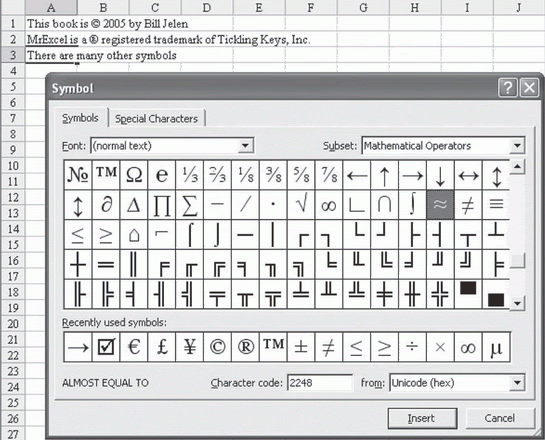
Strategy: Use (c) followed by a space as a shortcut for the © symbol. Use (r) as the shortcut for the registered trademark symbol, ®. For other special symbols, use Insert – Symbol to display the Symbol dialog, as shown in Fig. 160.
Vấn đề: Bạn đang làm việc cho 1 doanh nghiệp âm nhạc. Bạn thường xuyên phải sử dụng những ký hiệu đăng ký bản quyền “©”.
Giải pháp: Dùng các ký tự (c) sau 1 dấu cách như 1 phím tắt cho ký hiệu ©. Dùng các ký tự (r) cho ký hiệu ®. Với những ký hiệu khác, dùng lệnh Insert Symbol để hiện bảng các ký hiệu như hình 160.

Fig-160.gif


Fig. 160

Select any symbol from the dialog and choose Insert to type the symbol in the cell.
Summary: To insert symbols in your worksheet use Insert – Symbol.
Chọn bất kỳ ký hiệu nào bạn muốn trong bảng và nhấn nút Insert để nhập vào ô.
Tóm tắt: Dùng Insert - Symbol để chèn những ký hiệu vào dữ liệu của bạn.

 
Lần chỉnh sửa cuối:
Web KT
Back
Top Bottom