
- Tham gia
- 30/5/06
- Bài viết
- 1,798
- Được thích
- 4,707
- Giới tính
- Nam
Tôi xin giới thiệu các bạn tạo và sử dụng Treeview trong VBA.
Tác giả: JKP Application Development Services and Peter Thornton (the Authors)
Vì 2 lý do trên mà Tác giả tạo Treeview này để sử dụng.
Treeview đã được kiểm tra (và đã làm việc tốt) trên Office 64 bit. Nó cũng có thể làm việc trên MAC office. Các phiên bản Office được kiểm tra bao gồm:
Excel 2000
Excel 2003
Excel 2010
Excel 2010 (64 bit)
Excel 2013 (32 bit)
Nguồn: tại đây.
Để sử dụng ta cần thêm 2 class sau vào VBAProject của mình:
1. clsNode
2. clsTreeView
Xin xem tập tin đính kèm.
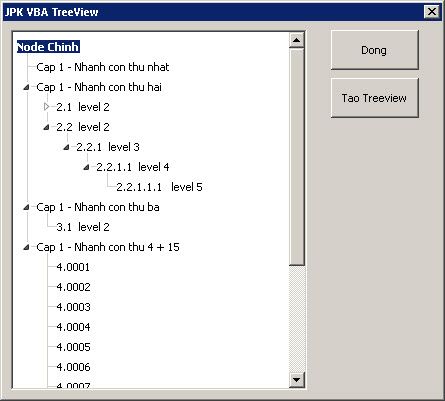
Để tạo ra Treeview này, bạn cần phải tạo một Frame trên UserForm.
Vị trí bạn đặt nơi nào bạn muốn thể hiện Treeview. Giả sử tôi tạo Frame có tên là frmDemo
Tôi sẽ thử tạo một nút lệnh trên UserForm để tạo TreeView.
Đoạn mã của UserForm sẽ như sau:
[GPECODE=vb]
Option Explicit
Private WithEvents mcTree As clsTreeView
Public AppName As String
Private Sub cmdDong_Click()
End
End Sub
Private Sub cmdTaoTreeView_Click()
'Dau tien kiem tra va xoa Treeview truoc
If Not mcTree Is Nothing Then
mcTree.NodesClear
Set mcTree = Nothing
End If
'Goi thu tuc de tao Treeview
InitializeDemo1
End Sub
Private Sub frmImageBox_Click()
End Sub
Private Sub UserForm_Initialize()
AppName = "Tao VBA Treeview"
frmImageBox.Visible = False
End Sub
'##########Treeview Code##########
Public Sub InitializeDemo1()
'-------------------------------------------------------------------------
' Procedure : Initialize
' Company : JKP Application Development Services (c)
' Author : Jan Karel Pieterse (www.jkp-ads.com)
' Created : 15-01-2013
' Purpose : Initializes the userform,
' adds the VBA treeview to the container frame on the userform
' and populates the treeview.
'-------------------------------------------------------------------------
Dim cRoot As clsNode
Dim cNode As clsNode
Dim cExtraNode As clsNode
Dim i As Long
Dim k As Long
Set mcTree = New clsTreeView
On Error GoTo errH
With mcTree
' VBA Treeview can mot Frame tren UserForm
' Chi can ve Frame nay o cho ban muon Treeview xuat hien tren UserForm
' Chu y: Frame khong co Border va khong co Caption
' Thiet lap thuoc tinh ScrollBars = 3
' Thiet lap thuoc tinh SpecialEffect = 2
' Vi cac thuoc tinh nhu back color/fore color va Font
' cua Treeview se tuy thuoc vao cac thuoc tinh cua Frame
' do do, ban can phai thay doi neu can
Set .TreeControl = Me.frmDemo
.AppName = Me.AppName ' Lay ten cua bien AppName duoc khai bao o tren
' Thiet lap mot so thuoc tinh chinh cho Root cua Tree
.CheckBoxes = 0 ' Khong the hien checkbox
.RootButton = 1 ' Cho hien RootButton
.LabelEdit(bAutoSort:=False) = 0 ' Mac dinh la 0: co the chinh sua
.FullWidth = 0
.Indentation = 20 * 0.75
.NodeHeight = 20 * 0.75
.ShowLines = 1
.ShowExpanders = 1
' Win7 style icons, try "Win7Plus1" & "Win7Plus2" for preference
Call .ExpanderImage(Me.frmImageBox.Controls("Win7Minus").Picture, _
Me.frmImageBox.Controls("Win7Plus2").Picture)
For k = 1 To 1 ' # roots
' Them vao 1 node chinh va thiet lap Bold cho no
Set cRoot = .AddRoot(sKey:="Root" & k, sCaption:="Node Chinh")
cRoot.Bold = True
' Khi them child node vao root can chu y:
' Keys: chi la Khong bat buoc (optional) nhung neu ta them vao thi no phai la UNIQUE,
' Neu Keys bi trung ban se gay ra loi runtime
' (Duoi day se bao gom tat ca cac Keys cho tat ca cac nodes)
' Nhanh con thu 1
Set cNode = cRoot.AddChild(cRoot.Key & "_1", "Cap 1 - Nhanh con thu nhat")
' Nhanh con thu 2
Set cNode = cRoot.AddChild(cRoot.Key & "_2", "Cap 1 - Nhanh con thu hai")
' Neu ban muon them cac nhanh con nua, ban phai dung bien de luu va them vao sau do.
Set cExtraNode = cNode.AddChild(cRoot.Key & "_2.1", "2.1 level 2")
cExtraNode.Expanded = False ' this node will initially be collapsed, it's child node controls will not initially be created
' Tiep tuc them o day
Set cNode = cNode.AddChild(cRoot.Key & "_2.2", "2.2 level 2")
Set cNode = cNode.AddChild(cRoot.Key & "_2.2.1", "2.2.1 level 3")
Set cNode = cNode.AddChild(cRoot.Key & "_2.2.1.1", "2.2.1.1 level 4")
Set cNode = cNode.AddChild(cRoot.Key & "_A", "2.2.1.1.1 level 5")
'Now add another branch to the branch we stored earlier
cExtraNode.AddChild cRoot.Key & "_2.1.1", "2.1.1 level 3"
'Add a 3rd branch to the root, with a child node
Set cNode = cRoot.AddChild(cRoot.Key & "_3", "Cap 1 - Nhanh con thu ba")
cNode.AddChild cRoot.Key & "_3.1", "3.1 level 2"
' Them vao nhanh con thu 4
' Nhanh con nay se co 15 nhanh con
Dim iSoNhanhCon As Integer
iSoNhanhCon = 15
Set cNode = cRoot.AddChild(cRoot.Key & "_4", "Cap 1 - Nhanh con thu 4")
cNode.Caption = "Cap 1 - Nhanh con thu 4 + " & iSoNhanhCon & ""
' Them cac nhanh con vao Nhanh con thu tu vua tao
For i = 1 To iSoNhanhCon ' 15
cNode.AddChild cRoot.Key & "_4." & i, "4." & Right$("000" & i, 4)
Next
'SortTest cNode, False
Next
' Tao node va the hien dang cay
.PopulateTree
End With
Exit Sub
errH:
#If DebugMode = 1 Then
Debug.Print Err.Source, Err.Description
Stop
Resume
#End If
Debug.Print Err.Source, Err.Description
If Not mcTree Is Nothing Then
mcTree.NodesClear
End If
End Sub
Private Sub SortTest(cNode As clsNode, bRefresh As Boolean)
Dim i As Long, j As Long
Dim sText As String
Dim cChild As clsNode
If Not cNode.ChildNodes Is Nothing Then
For Each cChild In cNode.ChildNodes
i = i + 1
sText = ""
For j = 1 To 10
sText = sText & Chr(Int(65 + Rnd * 26)) & " "
Next
cChild.Caption = sText & " " & vbTab & Right$("000" & i, 4)
Next
cNode.Sort ndAscending, ndTextCompare
If bRefresh Then
mcTree.Refresh
End If
End If
End Sub
[/GPECODE]
Chú ý: ngoài ra trên UserForm tôi còn có một Frame frmImageBox để lưu trữ các hình để đưa vào các node của Treeview. (Xin xem tập tin ví dụ).
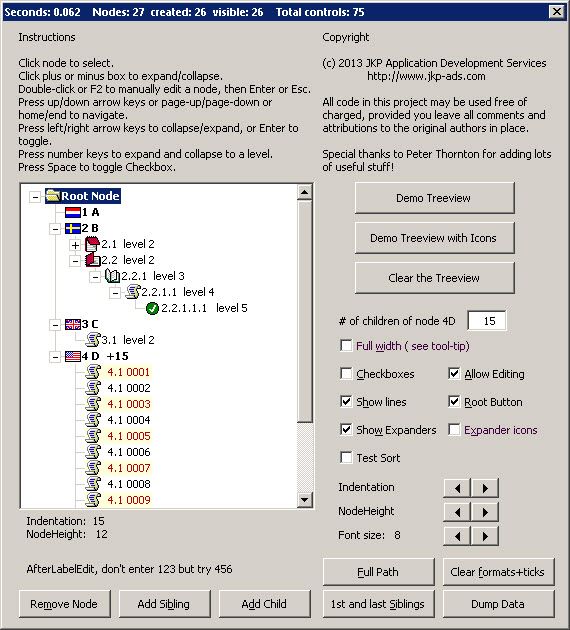
Các thao tác bạn có thể thực hiện trên Treeview này:
_ Click vào các node để mở ra/hoặc đóng các node con lại.
_ Double click hoặc nhấn F2 để nhập các chữ vào các node. Sau khi nhập xong thì nhấn Enter hoặc Esc để hoàn tất quá trình nhập.
_ Dùng phím page down/page up để di chuyển lên/xuống
_ Dùng phím mũi tên Trái/Phải để đóng các node con hoặc mở các node con.
_ Dùng phím Spacebar để chọn cho các Checkbox.
Thật là tiện lợi phải không các bạn.
Các bạn cũng có thể tự viết thủ tục để load dữ liệu từ một sheet lên Treeview này.
Have fun.
Lê Văn Duyệt
Tác giả: JKP Application Development Services and Peter Thornton (the Authors)
Vấn đề gặp phải khi dùng Treeview chuẩn đã viết:1. Compile errors due to a difference in how the control libraries are registered in 32 bits Windows' System32 and 64 bit Windows' SysWOW32 folders. If you distribute a file that was saved in 64 bit Windows, containing one of the "Microsoft Windows Common Controls 6.0" (The Treeview control is one of them) and with the reference set to "mscomctl.ocx", people using 32 bit Windows will almost certainly have problems. At best it could entail removing both the control and the reference and replacing both, but at worst the user's Excel can crash when trying to load the file and run the app.
2. Không sử dụng được cho các phiên bản Office 64 bit.
Vì 2 lý do trên mà Tác giả tạo Treeview này để sử dụng.
Treeview đã được kiểm tra (và đã làm việc tốt) trên Office 64 bit. Nó cũng có thể làm việc trên MAC office. Các phiên bản Office được kiểm tra bao gồm:
Excel 2000
Excel 2003
Excel 2010
Excel 2010 (64 bit)
Excel 2013 (32 bit)
Nguồn: tại đây.
Để sử dụng ta cần thêm 2 class sau vào VBAProject của mình:
1. clsNode
2. clsTreeView
Xin xem tập tin đính kèm.
Để tạo ra Treeview này, bạn cần phải tạo một Frame trên UserForm.
Vị trí bạn đặt nơi nào bạn muốn thể hiện Treeview. Giả sử tôi tạo Frame có tên là frmDemo
Tôi sẽ thử tạo một nút lệnh trên UserForm để tạo TreeView.
Đoạn mã của UserForm sẽ như sau:
[GPECODE=vb]
Option Explicit
Private WithEvents mcTree As clsTreeView
Public AppName As String
Private Sub cmdDong_Click()
End
End Sub
Private Sub cmdTaoTreeView_Click()
'Dau tien kiem tra va xoa Treeview truoc
If Not mcTree Is Nothing Then
mcTree.NodesClear
Set mcTree = Nothing
End If
'Goi thu tuc de tao Treeview
InitializeDemo1
End Sub
Private Sub frmImageBox_Click()
End Sub
Private Sub UserForm_Initialize()
AppName = "Tao VBA Treeview"
frmImageBox.Visible = False
End Sub
'##########Treeview Code##########
Public Sub InitializeDemo1()
'-------------------------------------------------------------------------
' Procedure : Initialize
' Company : JKP Application Development Services (c)
' Author : Jan Karel Pieterse (www.jkp-ads.com)
' Created : 15-01-2013
' Purpose : Initializes the userform,
' adds the VBA treeview to the container frame on the userform
' and populates the treeview.
'-------------------------------------------------------------------------
Dim cRoot As clsNode
Dim cNode As clsNode
Dim cExtraNode As clsNode
Dim i As Long
Dim k As Long
Set mcTree = New clsTreeView
On Error GoTo errH
With mcTree
' VBA Treeview can mot Frame tren UserForm
' Chi can ve Frame nay o cho ban muon Treeview xuat hien tren UserForm
' Chu y: Frame khong co Border va khong co Caption
' Thiet lap thuoc tinh ScrollBars = 3
' Thiet lap thuoc tinh SpecialEffect = 2
' Vi cac thuoc tinh nhu back color/fore color va Font
' cua Treeview se tuy thuoc vao cac thuoc tinh cua Frame
' do do, ban can phai thay doi neu can
Set .TreeControl = Me.frmDemo
.AppName = Me.AppName ' Lay ten cua bien AppName duoc khai bao o tren
' Thiet lap mot so thuoc tinh chinh cho Root cua Tree
.CheckBoxes = 0 ' Khong the hien checkbox
.RootButton = 1 ' Cho hien RootButton
.LabelEdit(bAutoSort:=False) = 0 ' Mac dinh la 0: co the chinh sua
.FullWidth = 0
.Indentation = 20 * 0.75
.NodeHeight = 20 * 0.75
.ShowLines = 1
.ShowExpanders = 1
' Win7 style icons, try "Win7Plus1" & "Win7Plus2" for preference
Call .ExpanderImage(Me.frmImageBox.Controls("Win7Minus").Picture, _
Me.frmImageBox.Controls("Win7Plus2").Picture)
For k = 1 To 1 ' # roots
' Them vao 1 node chinh va thiet lap Bold cho no
Set cRoot = .AddRoot(sKey:="Root" & k, sCaption:="Node Chinh")
cRoot.Bold = True
' Khi them child node vao root can chu y:
' Keys: chi la Khong bat buoc (optional) nhung neu ta them vao thi no phai la UNIQUE,
' Neu Keys bi trung ban se gay ra loi runtime
' (Duoi day se bao gom tat ca cac Keys cho tat ca cac nodes)
' Nhanh con thu 1
Set cNode = cRoot.AddChild(cRoot.Key & "_1", "Cap 1 - Nhanh con thu nhat")
' Nhanh con thu 2
Set cNode = cRoot.AddChild(cRoot.Key & "_2", "Cap 1 - Nhanh con thu hai")
' Neu ban muon them cac nhanh con nua, ban phai dung bien de luu va them vao sau do.
Set cExtraNode = cNode.AddChild(cRoot.Key & "_2.1", "2.1 level 2")
cExtraNode.Expanded = False ' this node will initially be collapsed, it's child node controls will not initially be created
' Tiep tuc them o day
Set cNode = cNode.AddChild(cRoot.Key & "_2.2", "2.2 level 2")
Set cNode = cNode.AddChild(cRoot.Key & "_2.2.1", "2.2.1 level 3")
Set cNode = cNode.AddChild(cRoot.Key & "_2.2.1.1", "2.2.1.1 level 4")
Set cNode = cNode.AddChild(cRoot.Key & "_A", "2.2.1.1.1 level 5")
'Now add another branch to the branch we stored earlier
cExtraNode.AddChild cRoot.Key & "_2.1.1", "2.1.1 level 3"
'Add a 3rd branch to the root, with a child node
Set cNode = cRoot.AddChild(cRoot.Key & "_3", "Cap 1 - Nhanh con thu ba")
cNode.AddChild cRoot.Key & "_3.1", "3.1 level 2"
' Them vao nhanh con thu 4
' Nhanh con nay se co 15 nhanh con
Dim iSoNhanhCon As Integer
iSoNhanhCon = 15
Set cNode = cRoot.AddChild(cRoot.Key & "_4", "Cap 1 - Nhanh con thu 4")
cNode.Caption = "Cap 1 - Nhanh con thu 4 + " & iSoNhanhCon & ""
' Them cac nhanh con vao Nhanh con thu tu vua tao
For i = 1 To iSoNhanhCon ' 15
cNode.AddChild cRoot.Key & "_4." & i, "4." & Right$("000" & i, 4)
Next
'SortTest cNode, False
Next
' Tao node va the hien dang cay
.PopulateTree
End With
Exit Sub
errH:
#If DebugMode = 1 Then
Debug.Print Err.Source, Err.Description
Stop
Resume
#End If
Debug.Print Err.Source, Err.Description
If Not mcTree Is Nothing Then
mcTree.NodesClear
End If
End Sub
Private Sub SortTest(cNode As clsNode, bRefresh As Boolean)
Dim i As Long, j As Long
Dim sText As String
Dim cChild As clsNode
If Not cNode.ChildNodes Is Nothing Then
For Each cChild In cNode.ChildNodes
i = i + 1
sText = ""
For j = 1 To 10
sText = sText & Chr(Int(65 + Rnd * 26)) & " "
Next
cChild.Caption = sText & " " & vbTab & Right$("000" & i, 4)
Next
cNode.Sort ndAscending, ndTextCompare
If bRefresh Then
mcTree.Refresh
End If
End If
End Sub
[/GPECODE]
Chú ý: ngoài ra trên UserForm tôi còn có một Frame frmImageBox để lưu trữ các hình để đưa vào các node của Treeview. (Xin xem tập tin ví dụ).
Các thao tác bạn có thể thực hiện trên Treeview này:
_ Click vào các node để mở ra/hoặc đóng các node con lại.
_ Double click hoặc nhấn F2 để nhập các chữ vào các node. Sau khi nhập xong thì nhấn Enter hoặc Esc để hoàn tất quá trình nhập.
_ Dùng phím page down/page up để di chuyển lên/xuống
_ Dùng phím mũi tên Trái/Phải để đóng các node con hoặc mở các node con.
_ Dùng phím Spacebar để chọn cho các Checkbox.
Thật là tiện lợi phải không các bạn.
Các bạn cũng có thể tự viết thủ tục để load dữ liệu từ một sheet lên Treeview này.
Have fun.
Lê Văn Duyệt
File đính kèm
Lần chỉnh sửa cuối:


